


Miniplane Top 80
by Had Robinson
updated January 17, 2025
Gear and wheel pullers should not be used when working with aluminum engine parts except under special circumstances.
Before putting any paramotor in service, new or used, CHECK THE TORQUE of the head nuts!
A. Troubleshooting your engine – Here are the steps and information to solve problems with your paramotor.
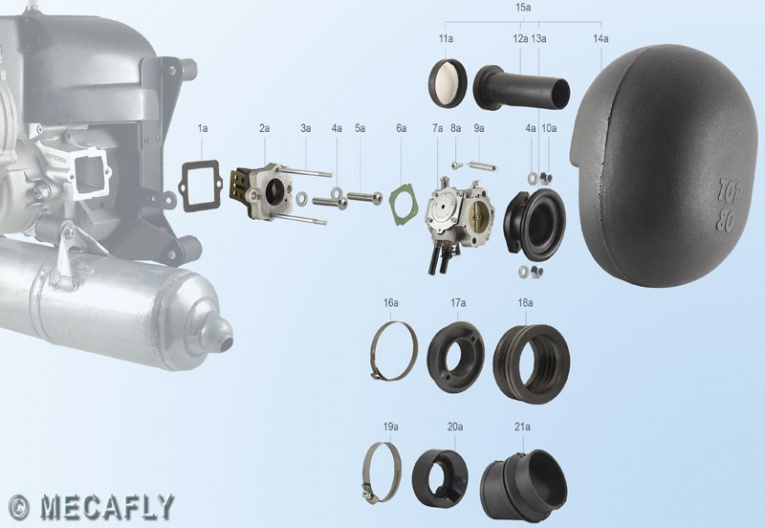
B. Top 80 parts diagrams Mecafly WG carb
C. Miniplane-USA info Miniplane Italy info Info from Mark Kubisch
SPECIFICATIONS – gaps, torque values, dimensions, timing value, and maintenance intervals for the Top 80
Air box – the air box usually has an internal air filter. It must *NOT* be saturated with oil. It is unnecessary and can restrict air flow into the engine. Periodically wash the filter in hot soapy water, as needed.
Air filter – see "Air box" above
AVGAS – see "Fuel & oil specifications" below. We no longer recommend using AVGAS because of lead fouling of the piston ring lands.
Bearing condition – shat condition are the bearings in my engine? Which one is the most likely to fail first?
Bearing replacement and case disassembly and assembly – here is how to replace the main crankshaft bearings and seals
Breaking in a new or rebuilt engine – this is critical that it be done correctly if you want your engine to have a long life.
Carburetor – Walbro WG information, adjustment, & repair Important notice: The WG and Husqvarna 503282001 are identical. The WG is no longer in open distribution except through Husqvarna.
Carburetor drips/leaks – see "Drips" below
Case assembly – see "Bearing replacement and case assembly" above
Choke – what does it do? Why have it?
Choke fault – the latest Top 80 model has a defective choke setup which must be fixed in order to start the engine when it is cold.
CHT – see "Cylinder head temperature gauge" below
Clunk – see "Fuel filter" below
Clutch – complete information on the Top 80 clutch. Also the "Redrive" section below
Clutch bearing replacement – it is done in the same manner as for the main bearings (see Bearing replacement... above). Steel does not expand as much as aluminum so a press MUST be used to install the clutch bearings. They will not just "clink" into place.
Cold weather operations – unfortunately, the WG carburetor and, to a lessor extent, the WB are sensitive to both high altitude and/or cold weather operations.
Connecting rod – see "Rebuilding a paramotor" below for info on this part including when it should be replaced (which must include the entire crankshaft).
Cooling box fin breakage – see "Metal fatigue" below
Cooling box – removal and assembly – see cooling box removal in "setting the timing on paramotors" page
Cooling fan – it is integral to the cooling box and is removed with it. See cooling box removal
Cooling shroud – when replacing the cooling shroud, put copious amounts of RTV between the large washers on the cylinder head studs and shroud. This will help cut down the wear of the shroud at these points due to severe engine vibration. Order of hardware: large washer, shroud, plastic washer, small metal washer, nut
Compression check – one of the best ways to quickly check the overall health of an engine.
Crankcase external pulse port – see "External pulse port installation" below
Crankcase replacement – see "Rebuilding a paramotor" below. The paramotor must be completely disassembled.
Cruise control – not a good idea and here is why.
Cylinder gasket installation – see "Squish" below
Cylinder head & piston notes – when doing the 100 hour required top end maintenance
Cylinder head O ring gasket installation – NEVER REUSE A CYLINDER HEAD O RING
Cylinder head temperature gauge – not having a CHT is like driving a car without any gauges or warning lights. Most of the time you don't need them....
Cylinder honing – if the cylinder is not seriously damaged, a re-hone is easy and cheap
Cylinder piston sizes – this is a table of the piston sizes (letters) for the corresponding cylinder diameter after boring or honing.
Cylinder replacement, new – see "Determining the correct size of gasket to use" and follow the directions. If a compression check gives a value less than 90% of specifications, replace the cylinder including the piston and ring. Also, see "rebuilding 2-cycle engines" below for more general info. Instead of replacement, pilots may have their cylinders bored and honed at this shop (RB Designs). You will have to measure the cylinder diameter with a micrometer, determine the correct oversized piston needed, get it from Miniplane-USA, and send it all in to RB Designs.
Cylinder squish – see "Squish" below
De-carbonizing a two stroke engine – Alex Varv shows how to do it without removing the cylinder. However, I do not recommend using any sealant between the cylinder and cylinder head. I have never had a head leak when the "O" ring is new and installed properly. The exhaust port should also be cleaned at the same time.
Detonation – this is a serious problem caused by cheap gasoline while running engines near sea level. Use premium ethanol-free fuel whenever possible in order to prevent this problem. Incorrect ignition timing and too little cylinder squish can also cause detonation.
Disassembly of the Top 80 – see "Engine overhaul" below
Drips – two stroke engine carburetors drip/leak fuel by design but it should not be excessive.
Engine mounts – see "Mounts, engine" below
Electrical troubleshooting – see "Ignition troubleshooting" below
Engine leaks – see "Leaks of the engine, exhaust, and redrive" below
Engine rebuild – see "Rebuilding 2-cycle engines" below
Engine stall – see "Stall" below
Exhaust – also see the "Muffler" section below
Exhaust port cleaning – after many hours the inside of the exhaust port and the manifold can have substantial deposits of carbon and/or lead phosphate/monoxide.
Exhaust port gasket installation
Exhaust port spring installation – the exhaust nuts must be tightened precisely against the spring and NOT overtightened.
Exhaust port leaks – see "Redrive, carb, crankcase, and exhaust leaks" below
Exhaust port repair tool – if the cylinder exhaust port is damaged, this tool can repair it. Here is how to do it.
Exhaust port stud installation
Exhaust springs – how to remove and install them correctly. Note: for a while Miniplane supplied defective springs which constantly broke.
External pulse port installation – needed for some accessories and the FSM
Fading – see "Performance Issues" below
Finger screw and starter pawl replacement
Finger screw modification – every time the cooling fan is removed, the finger screws should be replaced ($$$). Here is how to re-use them.
Frame cracking – see "Metal fatigue" below
Fuel filter – what kind/type to use? If you choose poorly, the engine will also run poorly, if at all. Removal and installation tips. The fuel system MUST be purged of old fuel and air when changing out the fuel filter.
Fuel line replacement – it is not as simple as most think....
Fuel mixed? – is there oil in the gasoline?
Fuel & oil specifications – 2% (50:1) full synthetic oil with premium ethanol-free gasoline.
Fuel system leaks – see also "Leaks of the engine" below
Fuel system modification – the FSM do-it-yourself project dramatically fixes fuel starvation and most performance issues
Fuel system test – a thorough test of the fuel system. This is the quick version of the test.
Fuel tank cap leaks – how to find and fix the factory defects which make it hard to prime the fuel system.
Gearbox – see "redrive" below
Gudgeon pin circlips – see "Piston wrist pin circlips" below
Harness strap repair – thinner pilots routinely have the buckles break. Here is how to easily fix the problem.
High altitude use – see the WG carburetor page
Hub – see "Propeller hub info, removal & installation" below
Ignition coil check – see "Electrical troubleshooting" below
Ignition coil, flywheel gap adjustment
Ignition coil, loose inner coil – when it becomes loose/detached from the iron core and how to repair it
Ignition coil, secondary wire replacement – this is the most common point of failure in the ignition system in all but the newest models
Ignition coil secondary wire troubleshooting – see "Electrical troubleshooting" below
Ignition timing – how to accurately set the timing on most paramotors
Knocking – see "Detonation" above
Leaks, carburetor – see "Drips" above
Leaks of the engine, exhaust system, and redrive (also, see "Fuel system leaks" above)
Leaks of the reed valve – see "Reed valve" belowMain bearing seals – if they leak slightly after 100's of hours of use, it only causes a little mess and is to be expected. Leave them alone.
Manual, owners – see "Owners manual" below
Metal fatigue – pilots who put 100's of hours on any paramotor must keep an eye out for this hazardous and hard to see problem.
Midrange roughness or four cycling – most paramotors run poorly in the midrange due to a rich air/fuel mixture, the range that we spend most of our time flying in. It can be fixed but not completely unless the FSM do-it-yourself project is installed.
Miniplane frame information – options, sizes, side stick lengths, etc.
Mounts, rubber (engine) – here is a way to quickly check them. These are normal consumable parts that fail with use.
Muffler oil leaks – see "Exhaust system O-ring leaks" above
Muffler problems – rarely, the muffler can get clogged (from Bill Stoll)
Net stringing – see "Safety net stringing" below
Net repair – see "Safety net repair" below
Net wear – see "Safety net wear" below
Oil leaks – see "Redrive, carb, crankcase, and exhaust leaks" below
Oil specifications for the Top 80 – see "Fuel & oil specifications" above
Overhaul – see "Rebuilding a paramotor" below
Overheating – this will destroy an engine. What causes it? How is it prevented?
Owners manual – from Miniplane, difficult to follow, poor English, badly organized :(
Packing the Top 80 for shipment (if you wish to just ship an engine, follow these instructions)
Performance issues – does your engine run poorly, if at all?
Piston circlips (wrist pin springs) – never reuse them. See this video for how to remove or install them. Stuff a rag in the crankcase so in case you drop one, it does not disappear in the guts of the crankshaft. Be certain that the circlip is completely seated and installed with the circlip opening facing down. This helps insure that the clips do not come out.
Piston failure – This page from Madsen's (a chainsaw dealer) gives many maintenance and repair tips on 2 stroke engines including the piston. Paramotors are more like chainsaws and motorcycle racing engines than any other. Paramotors use carburetors from an obsolete chainsaw.
Piston replacement – it is not advisable to attempt this without intermediate mechanical skills. See "Rebuilding a paramotor" below.
Piston Ring – how to remove and install it and tell if it needs replacement.
Piston sizes – see "Cylinder piston sizes" above
Power loss – see "Performance issues" above
Preheat system of air entering the carburetor
Priming the fuel system on a paramotor – see "Starting your paramotor" below
Propeller hub info, removal, & installation – note: A propeller strike that damages the propeller will likely bend the hub and cause vibration.
Propeller info – General information including how to correctly attach and repair it
Propeller bolt shear problems – see "Propeller Info" above. Also, see "T-Nut Milling Tool" below.
Propeller shaft seal replacement – see "Redrive propeller shaft seal replacement" below
Pulley, starter – see "Starter pulley" below
Purging the system of fuel – it must be done if a paramotor is to be stored for more than a few weeks, especially if you are using ethanol fuels.
Pulse port, external – see "External pulse port installation" above
Rebuilding a paramotor – includes disassembly and assembly of the major parts of the engine e.g. flywheel, cooling fan, carburetor, etc.
Redrive clutch – see "clutch" above. The redrive contains a clutch and a set of reduction gears.
Redrive propeller hub removal and installation – see "Propeller hub and removal installation" above
Redrive fill plug problems – see "Leaks of the engine, exhaust, and redrive" above. The plug can become clogged and cause leaks in the redrive
Redrive gear noise – it can be safely ignored. The noise will be more pronounced when the prop is rotated in one direction vs. the other.
Redrive lubricant – info on the correct type, quantity, and how to change.
Redrive mounting and alignment – see the clutch page.
Redrive mounting stud failure – stainless steel is inferior to class 12.9 steel hardware. The former will fail on engines with many hours.
Redrive propeller shaft seal replacement – here is how to quickly and easily replace the seal without taking the redrive apart.
Redrive removal and installation – see the clutch page.
Redrive seal replacement – see "Redrive propeller shaft seal replacement" above
Rich running condition – see "Performance tuning" above
RTV – e.g. Permatex Blue or Ultra Grey. Used to seal case halves, some gaskets, and surfaces. Apply with a clean finger. Forget the spout that comes with the tube. It is useless. Use Ultra Grey for sealing surfaces that may become hot, like the exhaust flange gasket. More sealant is not better. It is not as simple as most think.
Rubber mounts – see "Mounts, rubber" above
Safety net new installation or replacement
Safety net wear – how to minimize wear and tear on the safety net
Sand damage – it is fun to fly at the beach but taking off in the sand one time is worse than 100 hours of normal running time because sand gets into the engine. The fine grit can also cause the piston ring to stick, causing more damage. Always launch from grass. If it is wet, all the better.
Secondary wire replacement – see "Ignition coil, secondary wire replacement" above.
Secondary wire troubleshooting – see "Electrical troubleshooting" above
Sidestick mount protection – the sidebars and sidestick mounts will grind away on each other. Here is a fix.
Smoke systems – pilots must be extremely cautious when installing smoke systems on any 2 stroke engine with a tuned exhaust and here is why.
Spark plug boot replacement – it is not that simple if you want it to last and work well.
Spark plug info – meaning of the NGK part numbers
Spark plug installation – do not waste time troubleshooting an engine unless the spark plug is new. It must be gapped and installed correctly.
Spark plug reading – how to do it. A cylinder head temperature gauge (CHT) is essential and will confirm what the observed condition of the spark plug. Also see "Electrical troubleshooting" above.
Spark plug specifications – go to "SPECIFICATIONS" below
SPECIFICATIONS – dimensions, torque values, maintenance intervals, and other useful information
Springs, muffler – see "Exhaust system springs" above
Squish – pilots must get the correct size cylinder gasket to prevent overheating, detonation (knock), and engine damage.
Stall – going to full throttle, the engine stalls. Or, the pilot bends over and the engine stalls. What are the causes?
Starter – see "Finger screw and starter pawl installation and removal" above
Starter cord – how to replace it. See Mark Kubisch's notes below
Starter pawl and finger screw installation – see "Finger screw and starter pawl installation and removal" above
Starter pulley – the OEM Viadana pulley quickly wears out and fails. Here is the solution...
Starter replacement cord – this cord is 100% Dyneema line and is superior to the OEM cord.
Starter – how to properly disassemble and lubricate the starter and help it last longer.
Starter kick – when stopping the engine, the pawls engage the starter and kick the starter assembly hard. Here is how to prevent this.
Starting your paramotor – start your engine the first pull, every time. Here is the secret on how to correctly prime the carburetor.
Storage – if you are storing your paramotor for more than a few weeks, PURGE THE FUEL SYSTEM.
Stress cracking of the engine frame and other components – see "Mounts, rubber" above
Tachometer – is your engine due for routine maintenance? Has power output changed? You won't know without a tachometer/hour meter.
T-Nut milling tool – installing T-Nuts will beef-up the propeller-hub mounting system. It is Miniplane's response to the rumor-mills on the PPG blogs.
Threadlock – an important item in a pilot's toolbox
Throttle placement in the hand while launching a paramotor
Throttle support breakage – see "Metal fatigue" above
Throttle cable – cleaning, lubrication, important modifications, and cruise control info. For kill switch issues, see "kill switch problems" above.
Throttle return spring replacement – improve throttle response, lessen hand fatigue with this modification/replacement.
Timing, checking the value – see "Ignition timing check" above
Timing the Top 80 – see "Ignition timing" above
Tools – Paramotor essential tool kit
Troubleshooting the engine – see "Performance issues" above
Tune-up – see the WG carburetor page
Vapor lock – it is the most common fuel problem in paramotors due to the near universal location of the fuel tank far below the carburetor
Vibration – see "Propeller hub info, removal, & installation" above
Walbro WG carburetor – see "carburetor" above
Warming up – When the cylinder head temperature reaches 70ºC, the fuel/air mixture is 100% vaporized so the engine will not be fuel starved and potentially overheat. Various moving parts of the engine must also be at the correct temperature to reduce wear and seal properly.
Weight – 20.7 kg (45.5 lb) all up weight minus fuel
Wrist pin circlips – see "Piston wrist pin circlips" above
From Miniplane-USA
Parts – Miniplane-USA has excellent stock of everything and the best service. This site (in French) has detailed diagrams and information on every part in the Top 80 engine so that you can order the parts you need accurately. It is also handy when repairing the Top 80. "Where does this part go?" WARNING: Some of the part diagrams have errors in parts placement so caution is advised.
From Miniplane Italy
Disassembly of the Top 80 – Part 1 Part 2 Somewhat detailed video on how to take apart the Top 80 properly. It does not include disassembly of the motor itself (cylinder, head, reed valves, clutch, redrive). If the motor needs additional disassembly, see the respective notes on this page.
Historical features of the Miniplane – from the 1990's
Official website for operation & maintenance – it is now in English and updated by Miniplane about every 10 to 15 years. However, the English version of this site may not be online at times. Go here for Miniplane's professional service information but, as often as not, you will receive the "HTTP Error 404.0 - Not Found" error. The Southwest Airsports website would not exist if it were not for the incompetence and neglect of the web design people used by Miniplane IT. To give them credit, they have the most bug free paramotor made but only because it has been around for decades. Vittorazi is hot on their heals but they are still dogged by annoying bugs.
From Mark Kubisch
Service Notes – Redrive overhaul for older grease filled units (including lubricant replacement) & pull start cord replacement. When reassembling the cases, use grey type RTV sealant. Be sure to follow these instructions when applying RTV cement. Mark's technique for removing the propeller hub will damage it. Remove the hub with heat, as shown on this page. Also, bearings will simply drop out of case halves if proper heat is used. There is never any need to pry/pull on anything if the proper techniques and tools are used.
Pullers should never be used when working with aluminum. However, they can be used to gently remove things that are snug but only tightened with the fingers.
When removing the main redrive gear, do not let anything metal (steel) come in contact with the case half. Thin pieces of wood can be used to protect things. The small pinion should easy slide off the shaft and does not need to be pulled. Removing the bearings is easy.
From Alex Varv
De-carbonizing a two stroke engine – Alex Varv shows how to do it without removing the cylinder. However, I do not recommend using any sealant between the cylinder and cylinder head. I have never had a head leak when the "O" ring is new and installed properly.
![]()

