


Propeller hub info, removal, and installation
By Had Robinson
updated October 12, 2024
Notes
NEVER HIT A HUB WITH ANY KIND OF HAMMER. DO NOT USE A PULLER (except as explained below). DO NOT PRY IT OFF. SEE THE INSTRUCTIONS BELOW.
This page is about the Top 80 hub, other makes and models require the same steps given here!
Vibration in a paramotor is usually caused by a hub that has excessive face runout caused by a propeller strike or during shipping of the paramotor. The hub must be checked with a dial micrometer to be sure that the runout is not excessive (see below for more on this). It may be possible for a propeller strike to be severe enough to bend the redrive shaft. It should be checked for runout in the same way as the hub.
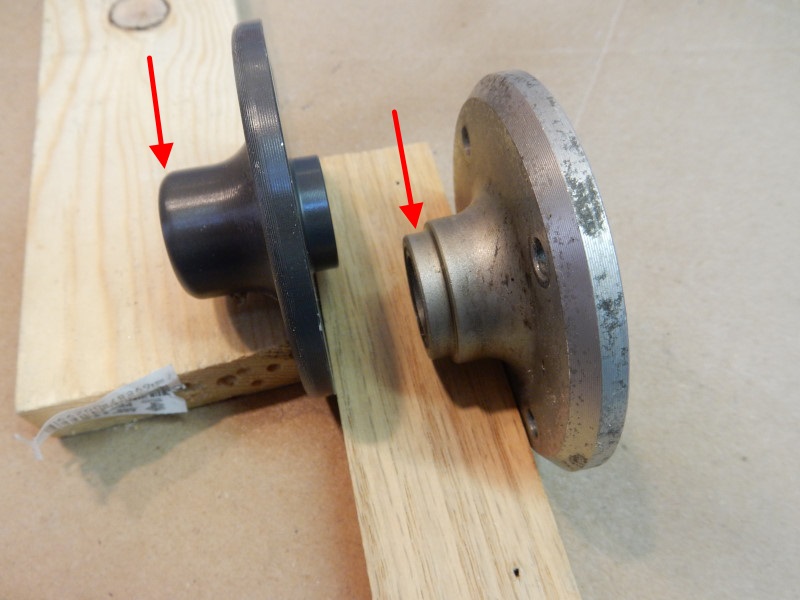
Hubs on redrives made before 2004 are different (see red arrows) and they are NOT interchangeable. The shafts are shorter and there are no seals in the redrive and why they were lubricated with grease. However, they are removed in the same manner.
The propeller hub should not easily slide off the shaft. This is by design and why a loose Top 80 hub must be replaced. Loose hubs are usually caused by propeller strikes. This bends the hub and the out of alignment propeller will vibrate severely. The resulting forces will chew up the area of the hub in contact with the propeller shaft.
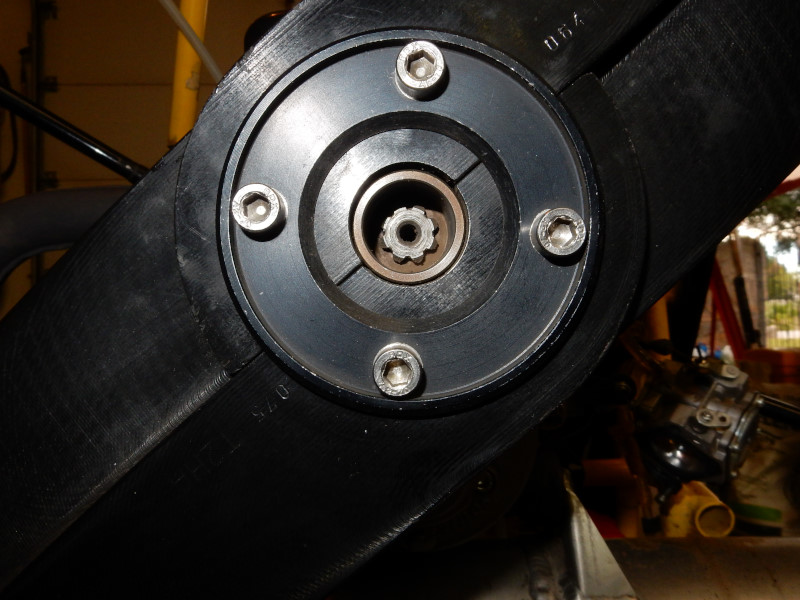
Here is a photo of a hub that was so chewed up that the propeller shaft extended 5+ mm above the face of the hub. The hub just rattled around on the shaft despite the presence of the center screw (removed in the photo). I am not sure what would have happened had the hub continued to wear and move towards the redrive case. It would eventually force the oil seal into the case or destroy the oil seal bore – all an expensive mess in one way or another.
Removing the aluminum hub with just a puller or banging/prying it off will damage it. However, some paramotors have hubs that will easily slide off the shaft but use a beefy center screw to firmly hold the hub tightly against the shaft. For the Top 80 and a few others, you should not able to pull the hub off the shaft by hand. If that is possible, it must be replaced.
WARNING: Flying with a loose or a damaged hub could cause catastrophic failure of the propeller and other parts. Putting threadlock, RTV, or silicone cement in the hub bore or on the propeller shaft will not fix this problem. I am not sure exactly what happens when the hub bore wears past a certain point but it probably would not be good to find out.
It is rare that the shaft or bearings are damaged. Propeller strikes, improper propeller installation, or propeller disintegration damages the aluminum hub. If a balanced propeller vibrates excessively, the hub is most likely the cause.
Because the hub is aluminum and the shaft is steel, it is an easy job to remove it but only if you have these special tools and follow the correct steps here. These tools can be purchased at Harbor Freight or an auto parts store and are good enough for occasional use.
- 3 Jaw gear puller or (best) a wheel puller, bolt type
- Propane torch
- brass brush or Dremel-type tool
- Kitchen or machine shop oven. (Get your woman's permission before sticking engine parts in her oven. It will not ruin the oven and you will have a happier life by getting permission first.)
You will need these tools if you had a propeller strike, experience vibration, and want to know if the hub is damaged.
- 1 In. Travel Machinist's Dial Indicator
- Multi-Position Magnetic Base with Fine Adjustment
- 4" x 6" piece of steel with a hole in it to attach to the engine to hold the magnetic base (not needed if you have a big vise).
Hub service
1. Hub and shaft evaluation and preparation
The redrive should be removed from the engine and the oil drained. Loosen the center screw. It often installed with threadlock which makes it difficult to extract. If it does not yield easily, spray penetrating fluid in and around it and let it sit an hour or more, overnight is best. If you force the screw, you may destroy the head or break it off – a very difficult thing to fix. DO NOT REMOVE THE CENTER SCREW AT THIS TIME.
Optional (but recommended): drain the oil out of the redrive. To help prevent oil going everywhere, remove the bottom drain plug first and then the top fill plug.
If you have purchased a new hub or choose not to evaluate the condition of the hub and shaft, go to step #2 below and skip the rest of this step.
Check the face (or axial) runout (FR) of the hub. Then measure the total indicated (or radial) runout (TIR) of the propeller shaft before taking it all apart. A good hub should have a FR less than 0.001". New hubs that I have measured are often in the range of 0.0005". Excessive FR will cause the propeller to vibrate, sometimes severely, and can lead to failure of the redrive and other parts of the paramotor including engine mount failure and frame fatigue cracks. The TIR is less important but should also be less than 0.001". If it is more than this, the redrive will have to be rebuilt.
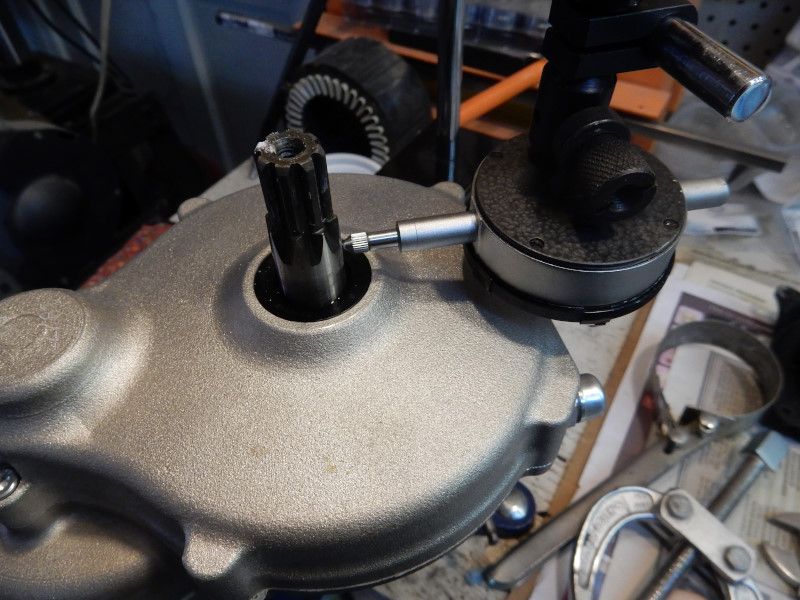
The hub below had a FR of > 0.025" and had to be replaced. This was indicated by severe vibration the pilot experienced when the paramotor was run at full speed. The tools (of sufficient quality) needed to measure this are a magnetic base tool holder and a dial indicator and are available together for under $30 from Harbor Freight. (Note: the professional tools pictured here are not from HF.) After setting up the dial indicator as shown, press firmly down with a finger on the center of the hub. This will eliminate any vertical movement of the shaft while rotating it. Slowly rotate the hub from the clutch bell side and note the FR – the difference between the high and low values.
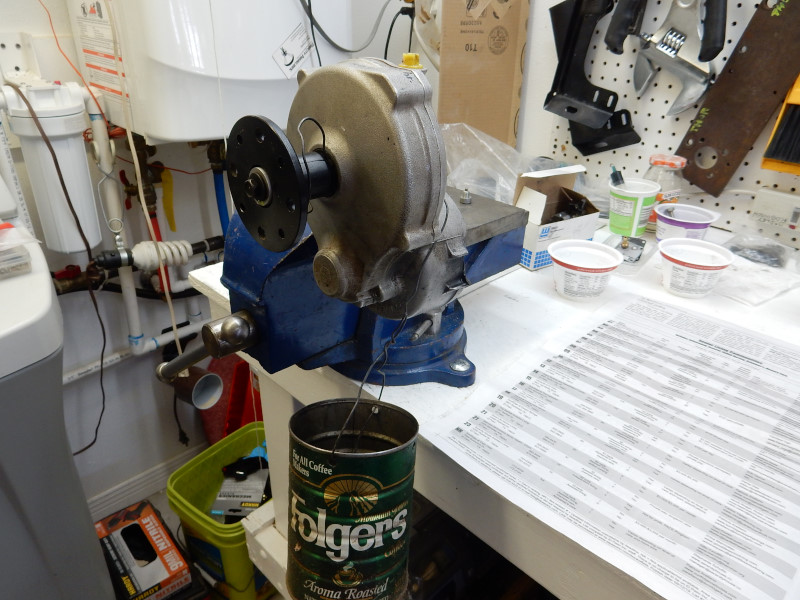
In the photo here, the magnetic base is fixed to the anvil of the vise. If you do not have a vise, a piece of steel must be attached to the engine upon which the base can be attached.
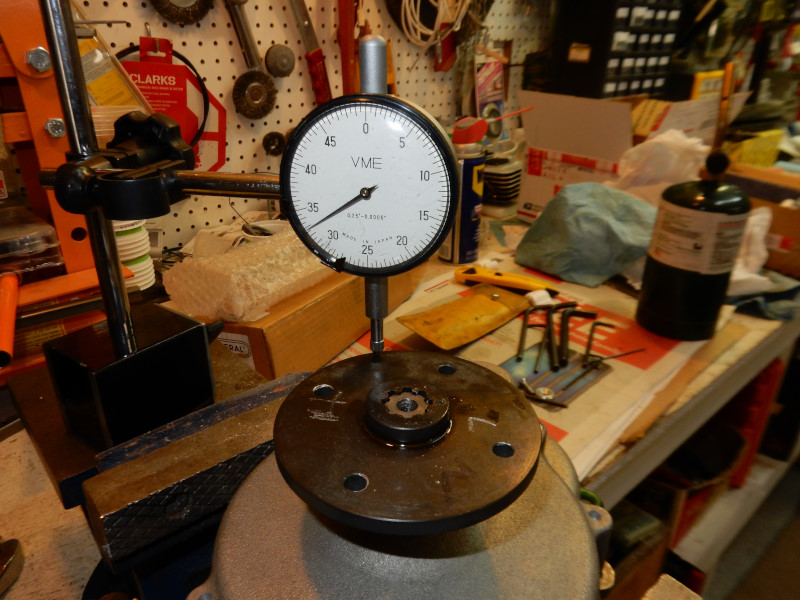

In the photo here, the propeller shaft runout was checked and was less than 0.0001". It should be checked if you had an accident at full power that damaged the propeller. Thankfully, the hub is aluminum and not steel. It is much less expensive to replace a hub than rebuild the entire redrive.
2. Loosen the center screw 10 turns
READ THIS SECTION COMPLETELY BEFORE LOOSENING THE CENTER SCREW!
The reason that the center screw should remain in the shaft is that the gear or wheel puller center bolt must not push against the hub AND the screw. Use an inexpensive oil filter wrench, a chain wrench, or two bolts with a screwdriver/piece of steel to keep the hub from rotating. If you do not have a tool to hold the hub, remount the propeller in order to keep the hub from rotating.
Once the hub is removed, be sure to chase the threads in the shaft to remove any trace of threadlock. Remember: the hub is NOT held onto the shaft by the center screw but by the friction between the hub and the shaft. This is why the hub must be heated before removing or placing it on the shaft!
Press down HARD on the 6mm hex bit tool as you turn the screw CCW. (Note: some hubs have a screw that must be removed CW e.g., some Polini models.) This helps keep the screw head from being deformed. If the screw does not budge, use penetrating oil and heat the hub, as in step #4 below. If the penetrating oil starts to smoke near the screw, things are too hot and you should stop applying heat. If things still do not move, you may have to repeat this step after more penetrating oil is applied and it is allowed to soak for an hour or more. Loosening things that are frozen requires patience. An impact wrench on a low setting may be used. If too high a setting used, it may snap the head right off. A better option for the most stubborn screws/bolts is this ingenious Japanese hand tool, the Vessel Impact Driver (available on eBay). It has a 1/2" drive which can take any adapter or socket with a hex bit. This tool will safely remove screws and bolts that an ordinary impact wrench will not. The use of heat may also be used but be careful to not get the shaft more than 250C.
If you twist the screw head off you will have to send it to us or a machine shop and it will cost $100+ to remove it.
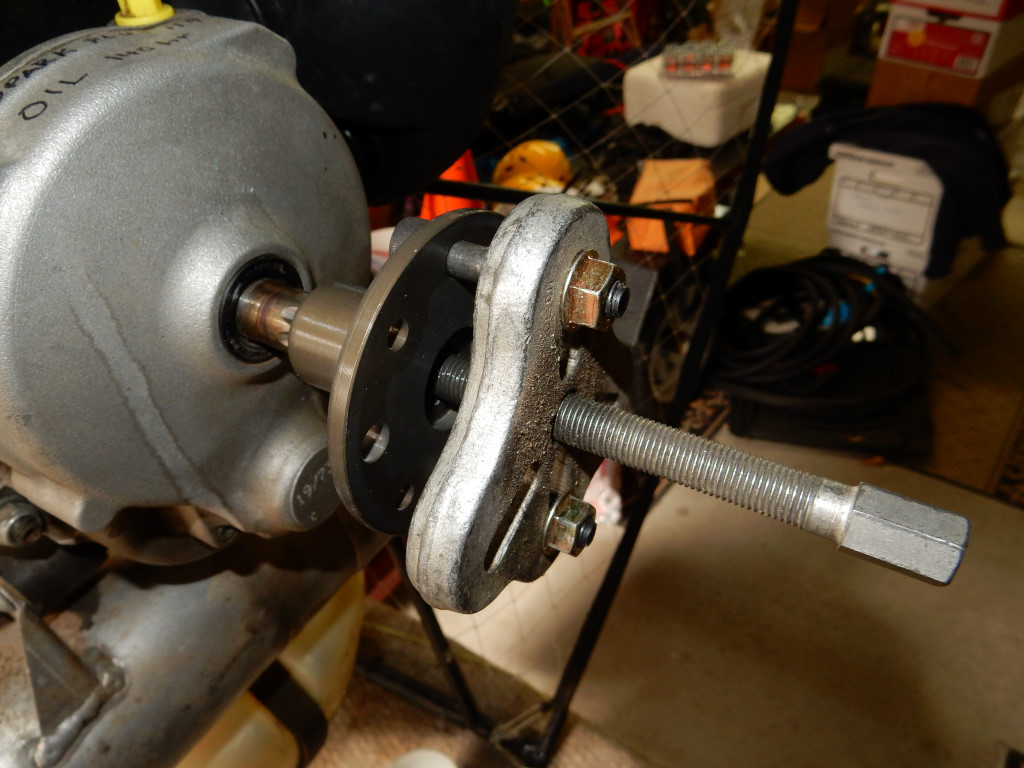
3. Attach the gear or wheel puller
The aluminum hub is easily damaged by the improper the use of a puller so it must be carefully done and the directions here followed exactly.
Attach the puller to the hub and tighten the center bolt on the puller by hand so that the puller is JUST snug. If the puller is tightened excessively, it will bend the hub and ruin it! This is why pullers must not be used in the usual way on aluminum parts.
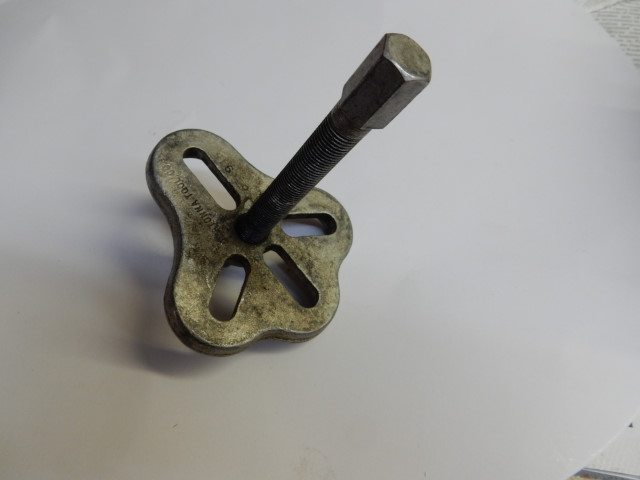
You want just enough force to slide the hub off the shaft after it is heated up. The puller applies uniform force to the hub which is difficult to do without this tool, especially if the hub is hot. A wheel puller, bolt type, (below) is the safest to use because it pulls closer to the center of the hub and is less likely to bend the aluminum hub and damage it.
4. Apply heat (Top 80 only and other hubs that have a press fit)
READ THIS SECTION COMPLETELY BEFORE APPLYING HEAT. IT IS EASY TO RUIN THE HUB AND THE OIL SEAL.
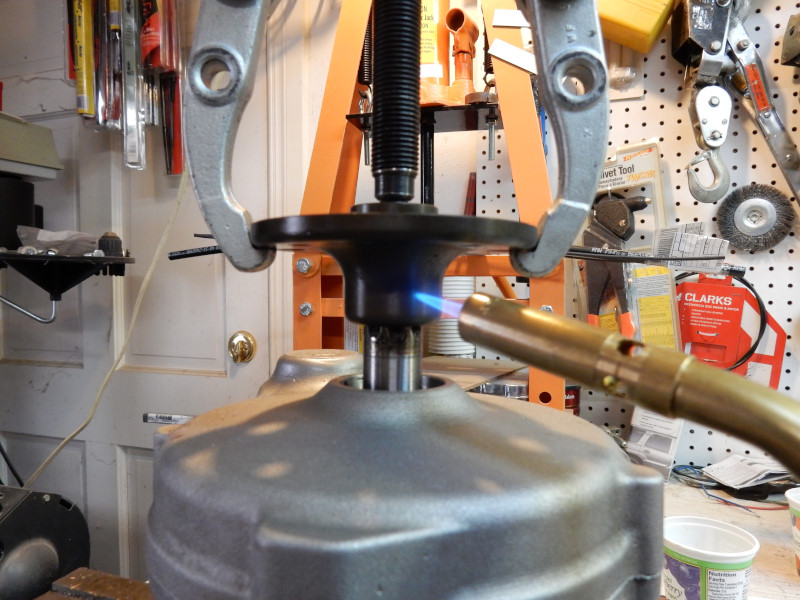
Use the propane torch to heat the hub for 30-45 seconds, as shown in the photos below. Direct the flame about 1/2" (1.2cm) below the bottom face of the hub. Rotate the hub by turning the clutch bell as the heat is applied so that the heat is evenly distributed around the center of the hub. Be very careful to not get the flame near the base of the propeller shaft where the neoprene seal is. As you heat the hub, gently wiggle the puller from side to side. The aluminum hub will expand and the joint between it and the shaft will loosen. When this happens, the puller will suddenly become loose. Remove heat and pull UP on the puller to remove the hub.
With some hubs, you may have to tighten the puller bolt until the hub is completely off the shaft. This is often the case if some ignorant person used RTV or threadlock on the shaft.
Sometimes, the hub may be corroded on to the shaft and may grip the shaft again as it cools. Apply heat again. If you see the slightest bit of smoke, STOP IMMEDIATELY and let things cool down. DO NOT OVERHEAT THE HUB or you will wreck it including the seal. Once the hub is removed, immediately cool the shaft with a rag soaked with water so that the neoprene seal does not get too hot. If you had to get things really hot, count on replacing the shaft seal.
The seal in the photo below had been jammed into the casing bore by glider lines getting caught in the propeller. The turning propeller wrapped the lines around the shaft, like a winch. The smooth lines worked their way along the shaft, pushing the seal in and ruining it.
The puller here is a jaw-type puller which is quick and easy to apply. It was used because the hub was ruined in the accident and I was not worried about damaging it.
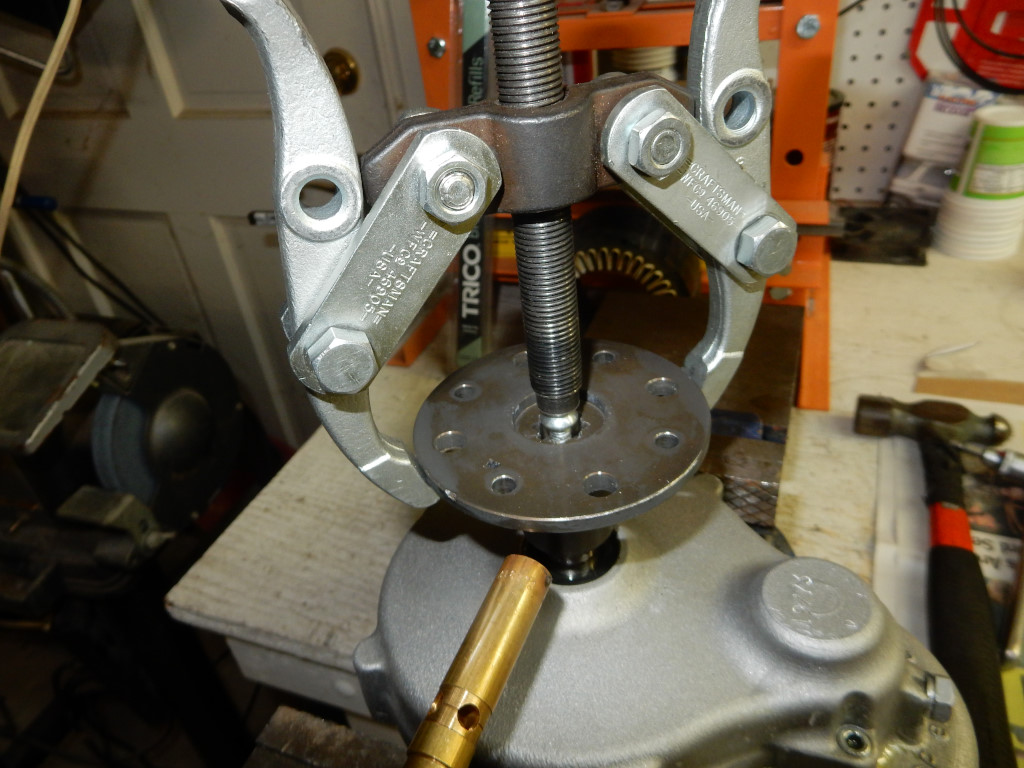
You can use a wheel puller, bolt type, which is the best and safest to use, especially if you have less experience as a mechanic.
4. Hub installation
Preheat the oven to 177ºC (350ºF). Let the temperature stabilize for about 15 minutes. Be certain that the oven temperature is correct. When aluminum is heated to 205º C (400º F), it enters the danger zone for its metallurgical properties. I.e. if the hub gets this hot, it will become soft aluminum.
The redrive must be placed as near as possible to the oven if it is in your woman's kitchen. During the next step, the hub will cool down too much if you have to carry it to your work area in some adjacent building or room.
While the oven is heating up, thoroughly clean the hub and shaft with solvent, using a brass wire brush. There must not be the slightest bit of threadlock, silicone, grease, oil, corrosion, etc. on the shaft or in the bore of the hub. Use a pick tool, if needed, to remove stubborn bits of whatever, just like the hygienist does to get plaque off your teeth. If this is not done, the hub will not go on smoothly during the next step.
Place the hub in the oven for 15 minutes. You must allow time for the hub to fully expand. If you have an infrared thermometer, measure the temperature. When it is close to the oven's temperature, it is ready.
Have a dead blow hammer handy.
Do not put any RTV, threadlock, or any type of sealant on the propeller shaft or in the bore of the hub.
Remove the hub from the oven and IMMEDIATELY align it with the shaft and let it drop home. It will make a nice "click". The shaft end should be no more than a few millimeters below the hub face. Immediately give the center of the hub a light tap with the dead blow hammer. This will ensure that the hub is fully home. If the hub does not drop home with a nice "click", it may not have been heated sufficiently or is either damaged or was not cleaned thoroughly.
After the hub is installed
If your hub is a press fit and the shaft is flush, above the hub face, or is loose after it cools, the hub is ruined and must be replaced. Using washers and spacers under the center screw will not fix a damaged hub.
If you suspect there is a problem, immediately remove the hub and let it cool off. Examine the shaft and hub again as you may have missed something. If things are clean, the hub is damaged and must be replaced.
As soon as possible, reinstall the center screw (do not use threadlock) while the hub is hot and torque to 9-10 Nm or to the value given for your engine. DO NOT OVERTIGHTEN THIS SCREW. Press fit hubs are held to the shaft via a tight fit, not as a result of the center screw. The screw for this type of hub prevents the hub from sliding off the shaft if it becomes damaged and starts to wear badly.
Optional: Measure the face runout of the hub again to be sure things are properly installed and not damaged. The FR should be less than 0.001".
5. Redrive installation
Reattach the redrive to the engine and install the propeller if it was removed.
For the Top 80 and similar models, follow these directions in order to align the redrive correctly. The redrive must be aligned properly to preserve the life of the clutch, to be able to adjust the low speed fuel mixture properly, and to minimize engine vibration. A misaligned clutch will have a much shorter service life.
![]()

