


Troubleshooting your paramotor
by Had Robinson
updated December 18, 2023
Discussion
The engine does not start? Overheats? Power output not as expected? Hard to start? Dies when throttle is quickly applied? Does not idle? You have come to the right page and the one our students use. Modest mechanical skills are required, including patience.
On the other hand, if you have reached a roadblock, do not have competent technical help where you live, or simply do not have the time, you may send us your entire paramotor and we can take care of it. If you wish to go this route, please carefully follow these directions.
The DIY tests below cover the (3) major and most common areas: A. fuel, B. ignition, and C. mechanical. All of these tests should be done because, often enough, there is more than one problem with a troublesome engine.
The majority of problems with paramotors are fuel related. Why is this? Nearly all paramotors have the fuel tank far below the carburetor. This design saves weight and expense. However, it is unique throughout the world of gas and diesel engines. Nearly all paramotors have diaphragm-type carburetors which have an internal fuel pump that moves the fuel from the tank.
The problem is that no diaphragm carburetor was designed to move fuel that is 24" (60cm) or more below the carburetor.
If the entire fuel system is not in perfect condition, there will be problems. Fuel starvation is the #1 problem we face in all paramotors. If we put a negative (suction) pressure on gasoline, the gasoline can form fizz/bubbles because it not manufactured to remain a liquid when subjected to a vacuum. When this happens, the fizz/bubbles in the fuel cause vapor lock. Vapor lock stops or slows down the movement of fuel through the entire system. In this case, a permanent and complete fix is available known as the FSM. It will be available for sale soon when testing is complete. It makes sure that the fuel pressure at the carburetor inlet is always slightly positive which is what diaphragm carburetors were designed for.
Meanwhile, what should we do?
This web page can help pilots with modest mechanical skills to track down and repair a paramotor. It will ensure, for example, that the fuel system is in perfect order. But this does not address the quality of the gasoline which may be used or that all gasoline is subject to vapor lock. Motor fuel (MOGAS) quality varies widely from country to country, state to state, and from season to season, including the altitude of where it is used. So the same brand and grade of your gasoline can fizz at a lower or greater negative pressure. AVGAS has the strictest standards of all gasoline but it, too, can fizz if the negative pressure and temperature are great enough.
When looking through this information pilots should also reference their respective engine specifications page for additional (and often critical) data for their motor. Even though these pages are specific for the listed motors, the information is largely the same for all two stroke paramotors, even the biggest ones.
If you are not mechanically inclined or gifted, find a chainsaw, kart racing, or dirt-bike shop to do the work for you. They are the most familiar with diaphragm carburetors. Chainsaw shops are the best because all high quality chainsaws use the Walbro carburetors. Few others know what they are doing, especially the lawn mower shops which, often enough, will make things worse, and even wreck your engine. Most motorcycle shops know little or nothing about diaphragm carburetors because modern motorcycles are fuel injected four stroke engines.
You must be able to identify the parts of your engine to do these tests. Refer to your engine manual or the pages on this website for help. If you have never changed the spark plug on a lawnmower or have little or no idea what the little screws do on a carburetor you should, perhaps, have someone else do the work for you.
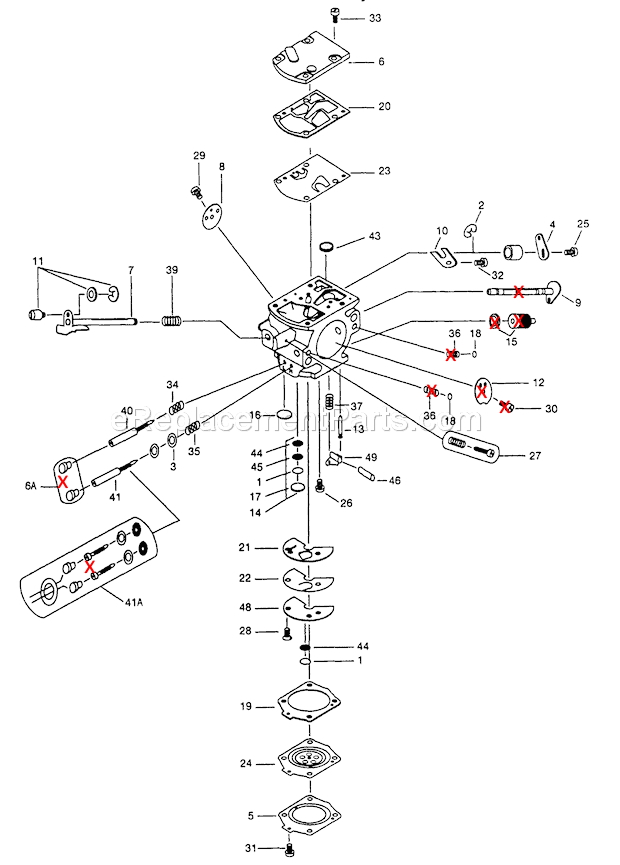
Here are the parts identification pages for the most popular carburetors:
- Walbro WG parts ID Note: the WG is also sold as the Husqvarna #503282001
- Walbro WB parts ID
- Tillotson parts ID Note: Italian paramotor makers have substituted Tillotson for Walbro on some of their engines. We are doing the best we can to get information and parts on these custom-made carburetors. Italian manufacturers have also made their own clones of the Tillotson. The Tillotson is very similar to the Walbro but is of inferior quality. The Chinese clones are the very worst.
The basic stuff that must be checked first!
Are you certain EACH of the following items have been checked before wasting your time and maybe a lot of money?
MOST PILOTS WASTE THEIR TIME AND MONEY ON NEW CARBURETORS OR REPEATED AND UNNECESSARY REBUILDS. REMEMBER THAT IT TAKES TIME TO DIAGNOSE THE PROBLEMS.
- Secondary ignition wire bad – This is the wire from the coil to the spark plug. It should be tested before doing anything else.
- Spark plug new, gapped correctly and tightened to the correct torque?
Replace the spark plug if in doubt. No engine can achieve
full throttle nor start easily without the spark plug being in perfect condition.
- Carburetor mounting screws/nuts tightened to the correct torque?
- Carburetor rebuilt within the last year? (Note: Tillotson rebuilds and adjustment are
similar to a Walbro.) Correctly adjusted? Old diaphragms cannot move fuel into the engine. Go to this page for
carburetor information.
- Quality, fresh fuel? Ethanol is a huge headache around the world. It collects water and makes goo as well as eats away at all non-metal parts.
- OEM quality inline fuel filter installed? Without this filter, the fuel inlet screen inside the carburetor will eventually clog or become restricted.
- Clogged fuel tank clunk? Most OEM clunks are
usually cheap and have a check ball that must be removed.
- Choke fully open and working? The big engines use the Walbro WB which does not have a choke, a
shame...
- Kill switch not shorted?
- Cylinder head nuts torqued to the correct value? If the head gasket leaks, the engine will not reach full power.
- Fuel lines not leaking? They must be carefully examined from the clunk on the pickup tube to the carburetor. Note: the lines do not leak fuel OUT but leak air IN. The smallest hole can leak air, create bubbles, and prevent fuel from moving through the small passageways in the carburetor. Air or fuel vapor bubbles in the fuel will cause pump failure and fuel starvation.
- Hot weather can cause vapor lock in any OEM paramotor and is not easily fixable unless special fuels are used. We are still testing the FSM that fixes this problem for good.
- Remove the inline primer bulb if there is one. The spring loaded check valves greatly increase the suction on the gasoline, fuel vaporization occurs and then fuel starvation. Use an alternate method of priming the carburetor. Why the manufacturers or pilots put these devices in their fuel systems is yet another mystery that makes no sense. The ONLY primer bulb setup that does not cause fuel starvation is when the primer bulb is NOT inline but sucks and then pumps fuel directly into the air cleaner. However, this arrangement will not work with the FSM – but the FSM does not need an inline primer bulb, anyway.
- A clogged muffler will greatly increase the pressure inside the crankcase which will slow or even stop the operation of the pulse operated fuel pump in the carburetor. Clogged mufflers prevent the engine from idling properly, if at all. Italian paramotor exhaust systems are notorious for internal breakage of parts that cause restrictions in the exhaust stream. Mufflers must be checked to be sure that the internal parts are intact!
A. Fuel problems
1. Problems we may find after performing the tests on this page
There are numerous areas of fuel systems that cause fuel starvation either alone or in combination with other problems. Remember that if your operating conditions are not perfect (70F/25C at sea level), you can expect performance issues if there are any marginal problems. These marginal problems can be:
- Vacuum side of the carburetor fuel pump can have leaks and/or a restricted/undersized pulse port
- A leaking reed valve body
- The fuel line at the carburetor inlet can be leaking air. If it is, fuel starvation will occur.
- Stiff/old/incorrect/perforated fuel pump and metering lever diaphragms (the most common cause of fuel starvation and overheating)
- Clogged inlet filter screen (inside the carburetor) caused by not having an inline fuel filter installed
- Leaking/clogged inline fuel filter (use ONLY premium filters)
- Clogged pickup tube filter in the fuel tank (a particular problem when fuels containing ethanol are used). Ethanol makes goo which clogs everything.
- Incorrect metering lever adjustment which can cause a lean fuel/air mixture when at or approaching wide open throttle (WOT).
- Incorrect sized (rare) or misadjusted main jet – high altitude and/or cold conditions (near or below 0C/32F) affects fuel viscosity and the suppleness of the pump and metering lever diaphragms, and can lean everything out.
- The pilot bends over and the engine stalls. This is not a repairable problem. It is usually caused by the accumulation of fuel and oil in the crankcase. Bending over will allow the flywheel to slop a puddle of fuel (usually with a higher concentration of oil) into the combustion chamber. The engine may either smoke a lot for a moment and/or stall.
- Clogged muffler causing over-pressure in the crankcase resulting in fuel pump failure, low performance, and idling problems.
All diaphragm carburetors are designed to be used with a fuel tank at the same level as the carburetor. As a result the fuel pump inside the carburetor has difficulty pumping the fuel from a tank 24" (60cm) or more below. The entire fuel system up to the internal fuel pump has a negative pressure and why fuel lines and filters must be in perfect condition. Here is a video of fuel starvation because of a fuel supply problem, probably an excessive metering lever height. It occurred within a few seconds here but it can sometimes take much longer, even a few minutes.
If you have a Bing carburetor or a float-type carburetor, you will need to purchase the respective service manual. Pilots can purchase the Bing service manual here which can be used for other float-type carburetors. Float-type carburetors are expensive and much more complicated to tune than a diaphragm carburetor. Unfortunately, the Bing service manual is more a tedious discussion with page after page of irrelevant detail than a useful set of instructions for pilots on how to tune it. It needs to be completely rewritten.
An improperly adjusted metering lever (ML) can cause a sudden or delayed (3-8 seconds) hesitation, fade, or stoppage of the engine when the throttle is fully opened (as in the video above). It may only cause problems in cold weather but not in summer/warmer weather or it may limit the top speed of the motor but only sometimes, depending on the fuel type and/or altitude. The tests below will pass but the metering lever (ML) adjustment can still be incorrect and the engine may experience problems and why this adjustment must always be checked. See Fading/stopping near/at full load below for more information on this issue after you perform the following tests.
Fuel starvation is the #1 problem that I see in the motors coming in here.
2. Vapor lock/fuel starvation test
This is the #1 problem with all paramotors that have the gas tank far below the inlet fitting on the carburetor. Gasoline must be 100% liquid in order to move through the fuel system especially at fuel throttle. The pump inside the carburetor CANNOT pump gasoline that has bubbles/fizz in it. The bubbles seen in the fuel lines are usually mistaken for air but this rarely is the case.
If your paramotor has a primer tube setup, do the Quick Test given on the FSM page. If the test fixes the problem, you need the FSM.
If your paramotor has a primer bulb or some other geeky way to prime the engine, do this: buy a gallon of pre-mixed fuel made by VP Racing Fuels. These fuels are 94 octane (98 in the EU) and use 100% premium synthetic oil. They have 50:1 and 40:1 mixes available. This is the finest quality fuel available and does away with the severe problems caused by the presence of ethanol in gasoline. Most major retailers (Atwoods, Wal-Mart, Lowes, and Home Depot) have it. VP Racing Fuels contain stabilizers so that the containers can be opened, exposed to the air yet, according to the manufacturer, will remain fresh for a year. Drain ALL of the existing fuel from the tank, add the VP fuel, and see how the engine runs. If the engine runs even marginally better, you have your answer. Installing a positive pressure fuel system like the FSM should be done. If the engine runs normally, you have the option of buying the racing fuel rather than installing the FSM.
3. Test to determine if a carburetor rebuild may be necessary or if the fuel lines are leaking
This will test the condition of the fuel pump check valves in the carburetor and reveal whether there is a leak in the fuel lines. If it does not pass, it is a waste of time to perform any other tests on the fuel system. Parts of the fuel pump diaphragm are used to create the check valves inside the fuel pump circuit. If these valves leak at all, the fuel pump capacity and pressure will be less, especially at full throttle and may cause a lean condition/fuel starvation. The diaphragm material slowly stiffens and decays after exposure to gasoline, especially if it contains ethanol. It takes about 6-12 months for the neoprene material to become stiff enough to stop the pump from working.
- If possible, start and run the paramotor for 5 minutes or more. If it will not start, prime the carburetor making sure there are no bubbles in the fuel line where it enters the carburetor back to the inline filter. Bubbles can be removed by tilting the engine so that they move into the carburetor when priming it.
- Stop the engine.
- Carefully observe the fuel line just where it enters the carburetor. Fuel (i.e. a moving bubble of fuel or air in front of the fuel) should not be seen moving back towards the inline filter and tank after the engine is shut off. If all is good so far, wait at least 5 minutes and see if the fuel is still holding in the line. That is, there are no vapor or air gaps in the fuel line moving back to the tank. If everything is good, a rebuild is probably not necessary if the carburetor has been rebuilt less than a year ago. If the fuel line entering the carburetor has a clamp of some sort, make sure it is tight. If there is any doubt about its function, remove it and use a 2.5mm (3/32") nylon zip tie, instead. *Double wrap* it around the line where it attaches to the carburetor to see if this fixes the problem. If the test still fails, a rebuild is necessary.
- Repeat step "a." above and check the fuel lines all the way back to the tank to be sure there are no bubbles entering the fuel line and the fuel is not moving through the fuel line, especially at any joints. Use clamps or zip ties, as necessary, to stop leaks. This is a particular problem with old fuel lines and why they should be replaced every few years, depending on their quality, amount of use, and type of fuel used.
If there is any doubt about the outcome of this test, rebuild the carburetor. If this test passes, continue. Note: you may still need to rebuild the carburetor because the above test does NOT test the condition of the pump or metering lever diaphragms.
4. Quick fuel system test
Option a. Pop-off gauge test If you have a pop-off gauge, the official Walbro test works better than the routine given below (it can be done on the ground with the engine off) and is the one recommended by Walbro. However, this test will not reveal whether your fuel tank is too far below the carburetor and the internal pump's ability to move the fuel such a long vertical distance without vaporizing the fuel.
Option b. Inflight quick test This test determines if you have fuel starvation issues. If you prime your engine by pressurizing the fuel tank with a primer tube, you are in luck for doing an inflight test of the fuel system. Use a piece of rubber tubing to extend the primer tube so it can be reached while in flight.
Be sure to secure the end of the tube with a line or tape so it cannot get into the propeller. With the tank about 1/2 full, take the paramotor to a safe altitude (1,000'/300m). With the primer tube extension in your mouth, go to near or at full throttle.
If the engine starts to hiccup or stall, pressurize the fuel tank as you would when priming the system. If you are experiencing any kind of fuel starvation, the engine should now run normally. The change may be immediate or it make take a few seconds if fuel vaporization is the issue (the bubbles/fizz must pass through the carburetor first). If the engine runs OK, you know that you have fuel starvation issues. It can be due to bad/cheap fuel, high ambient temperature, need of a carburetor rebuild, or any other defect in the fuel system. You will have to spend the time to diagnose what is causing the fuel starvation issue by proceeding with the tests given below.
5. Fuel system test
The following routine will help you to see if fuel is able to pass through all of the lines, filters, and valves of the fuel system including the high speed jet. However, this test does NOT test the fuel pump. This will only work if the metering lever (ML) diaphragm side of the carburetor is exposed so that you can push down on the ML diaphragm. Some paramotors have the ML diaphragm side of the carburetor facing the backrest on the frame with almost no clearance. You will have to figure out on your own how to gain access to the ML diaphragm. Usually, removing the backrest will work.
TOP 80 ONLY: If you have a Top 80 with the new "primer bulb" priming system, you will have to find a way to pressurize the fuel tank. The easiest way is to remove the sealed tube from the unused top bulkhead fittings and add a 15" (30cm) tube that is accessible by mouth in order to pressurize the fuel tank. Miniplane's scheme to eliminate the primer tube used for decades is a disaster because the tiny fuel line they use splits and leaks after a while. Furthermore, there is no way to quickly test the fuel system for problems. Had's advice: Rip it all out and retrofit it with the old system.
Fuel system test:
- Remove the air box/filter, if there is one.
- Tip the engine so that the throat of the carburetor is lower than where it attaches to the engine. This must be done so that fuel will run OUT of the carburetor and not INTO the engine, flooding it. Some engines, like the Minari or the Vittorazi Moster, cannot be easily tipped to prevent flooding. In this case, stuff a small rag into the carburetor throat to prevent engine flooding.
- Create fuel pressure at the carburetor inlet. There are (2) ways to do this, depending on your priming mechanism. Pressurize the fuel tank with the priming tube and hold the pressure with the tip of your tongue. (I use a piece of windshield washer hose connected to the priming tube so I can better see what is going on.) If you have a primer bulb, maintain pressure on the bulb while performing this test.
- Press down and hold the priming lever on the carburetor. (With engines that have a vertically attached carburetor, hold the priming lever just long enough to see if fuel begins to dribble out of the main jet and/or holes in the throat of the carburetor.)
- Fuel must dribble in a steady stream out of the carburetor. (For the Minari and Moster 185, leave the throttle wide open for another 10 or 20 minutes while you are doing other tasks so that the excess fuel can evaporate. It is very EASY to flood engines that have the carburetor on top.)
If the fuel does not dribble out, remove the fuel line going into the carburetor and use the priming tube (or primer bulb) to pressurize the fuel system again. If ONLY air comes out of the fuel line, the pickup tube in the fuel tank is either separated from the fitting at the top of the tank on the inside or has a hole in it.
If fuel comes spurting out of the disconnected fuel line, you know something in the carburetor is stopping the flow of fuel, probably a clogged fuel inlet screen. A rebuild of the carburetor is necessary.
If little or no fuel comes out of the fuel line, you probably have a clogged inline filter, pickup tube filter, and/or a crushed fuel line. In this case, remove the fuel line entering the inline fuel filter and pressurize the tank/squeeze the primer bulb. If fuel does not come pouring out, the pickup tube filter is likely clogged but it could also be a crushed/creased fuel line somewhere.
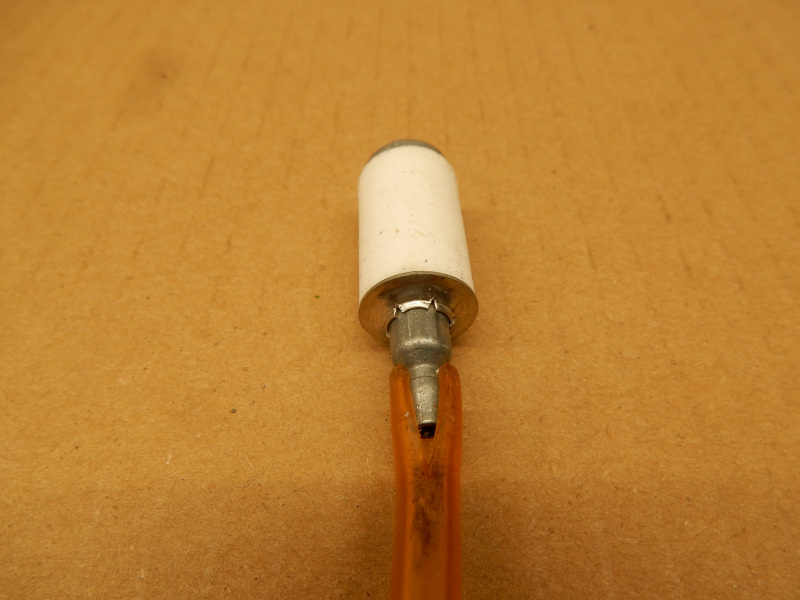
Below is a photo of a defective fuel line on a Miniplane Top 80 where it was connected to the internal fitting at the top of the tank (a clunk was put on the fuel line to show the split). This defect went unknown for some time because it is not visible unless the fitting at the top of the tank is removed (unscrewed). The split allowed air to be sucked into the fuel system but was not bad enough to prevent the line from staying connected to the fitting. The leak made the engine impossible to prime and difficult to start. The entraining of air became worse as the split increased in length. Nonetheless, the carburetor fuel pump was just able to pump enough fuel (mixed with air) to run the engine but it was running lean. The failure of the OEM line demonstrates why only premium fuel line e.g., Tygon® LP1100 Low Permeation Fuel Tubing or equivalent, should be used in paramotors.
If this test passes, continue.
6. Low speed jet test (optional)
It is very rare to have a clogged low speed jet because the inlet filter screen prevents globs of goo from ethanol fuels and debris from getting this far into the carburetor. But I recall working on a carburetor that had the inlet filter screen removed.
To check whether the low speed system is OK just unscrew the low speed jet adjustment screw and remove it. (Be sure to first
gently screw it in while counting the number of turns so that you can later
return it to its original setting.) Prime the carburetor.
Fuel should dribble out of the idle screw hole on the outside of the carburetor.
If the low speed jet is clogged (no fuel dribbles out),
you will have to remove and disassemble the carburetor and see what the problem is.
7. Thorough carburetor and fuel system test
(Skip the discussion here and go directly to the test)
The use of diaphragm carburetors in marginal conditions can cause fuel delivery problems. These conditions include:
- use of gasoline containing ethanol
- temperatures less than 15C (60F) or greater than 32C (90F)
- use of non-synthetic oils which do not retain their viscosity very well in low temperatures
- any leaks or restrictions in the small passageway that goes from the fuel pump to the crankcase (the pulses which power the pump). This is a particular problem with the Top 80
- a clogged muffler that increases the pulse port pressure inside the crankcase.
Any one or a combination of the above conditions can cause fuel starvation.
In general, ensure that all passageways from the crankcase pulse port to the fuel pump are clear. We are working on a simple solution, the FSM, which will overcome the design limitations of the WG and the WB carburetors (and their relatives). The FSM will not fix problems, however, that are due to lack of routine maintenance, such as tune-ups.
The fuel pump works by means of the rapidly changing pressure (pulses) in the crankcase every time the piston goes up and down. These pulses are transferred through a small tube and/or passageway to the fuel pump diaphragm which, in turn, moves it up and down. By the use of one-way valves, the pump sucks fuel from the tank and pumps it to the metering lever valve in the carburetor. Leaks, clogs, or misalignment of the gasket (all engines with an internal pulse port) between the carburetor and the reed valve can prevent the pulses from the engine reaching the fuel pump. If a vacuum gauge is available, fuel pump vacuum after about 20 rotations of the crankshaft should be 5"-7" of H2O depending on whether the system is dry or has fuel in it.
A problem with the fuel pump and/or the filters will cause high-end fade when operating at or near full throttle. When it is severe, the engine will not even start. Problems of fuel starvation can occur immediately, after a few minutes, or even up to 10 minutes or more. During marginal conditions fuel starvation can occur gradually. (Pilots often misdiagnose this problem thinking that fuel starvation can occur immediately.)
IF THESE PARTS OF THE FUEL SYSTEM ARE NOT REPAIRED, THE ENGINE MAY OVERHEAT AND BE DAMAGED.
The complete fuel system test will not only ensure that the filters are working but will also test the fuel pump, one of the critical components of the entire fuel system and usually overlooked:
- Remove the metering diaphragm cover, the diaphragm assembly, the metering lever, and the inlet needle valve. (See the Walbro carburetor service video if you need help.) On some engines e.g. Moster 185, the harness or back plate may have to be removed to access the metering diaphragm cover. Engines with an internal pulse port e.g. Top 80, newer Moster 185's: The airbox junction must be attached to the carburetor and the nuts tightened. Alternately, the nuts and washers (without the airbox junction) can be used to ensure that the carburetor is *NOT* loose. If it is, the pump will not receive any pressure pulses from the crankcase and it cannot pump fuel.
- Drain all but a few inches/cm's of fuel from the tank (this will thoroughly test the pump).
- Reattach the fuel line to the carburetor, if removed.
- Remove the spark plug and reattach it to the plug wire and lay the spark plug on top of the engine so that it touches the head nuts or some other metal part (this grounds the spark plug). If you do not do this, you may destroy your ignition coil.
- So that you do not wear out the starter, prime the carburetor. Fuel should POUR out of the carburetor inlet
valve hole on the ML side of the carburetor, as in this video (courtesy Alex Clappsy). If it does not spurt out
when priming the system, the same or more as in the video, some part of the fuel system is clogged.
Note: the video also includes the results of the next step.
- Pull on the starter. You should see fuel spurt out of the inlet needle valve hole just like a squirt-gun for at least a yard/meter or more. See also the video from Alex Clappsy above. Every time the piston goes and up and down, a solid stream of fuel should come out of the hole just like in the videos.
THIS TEST MUST BE DONE FOR AT LEAST A FULL (15) OR MORE SECONDS TO ENSURE THAT FUEL IS DRAWN ALL THE WAY FROM THE END OF THE TANK PICKUP TUBE. Again, if the fuel spurts out any LESS than as demonstrated in the video, there is a problem with the carburetor or with the pulses getting to the carburetor from the engine crankcase.
If no fuel spurts out or it only spurts a foot/0.3m, the fuel pump is not working correctly. The passageways/tubes from the crankcase to the pump may be clogged or leaking and/or a carburetor rebuild is required. For engines with an internal pulse port – see #8 below.
Most paramotors connect the pulse port directly to the crankcase with a short piece of tubing. A carburetor rebuild renews the diaphragm and check valves that are necessary for good pump operation. Lastly, there may be a restriction in the fuel supply line somewhere. This could include the pickup tube filter inside the fuel tank, as mentioned earlier on this page.
If the above tests pass, put the carburetor back together. If not, rebuild the carburetor and run the tests in this section again, unless it is a Top 80 or the newer Moster 185. For these engines perform the special test #6 below. Nonetheless, if the tests above fail, run the miscellaneous tests below.
With the complete fuel system test above, you will know that the fuel system is in order and you may continue to section B if you still have engine problems.
8. Top 80, Moster 185, and all engines with an internal pulse port (through the reed valve body)
The above test may fail with a newly rebuilt carburetor, the fuel supply system in perfect order, OR even with a brand new engine.
When the engine is run "off idle" (1/4 or more throttle), it suddenly dies. It may act as if the ignition is shorting out because the engine stops suddenly. This problem is unique to engines with an internal pulse port e.g. Top 80, newer Moster 185's because of how the fuel pump is powered. The reed valve body may be loose and the passageway between the crankcase and the fuel pump is leaking air around the gasket or the passageway is *restricted or clogged*. Another problem is that the gasket between the carburetor and the reed valve body can shift enough that it blocks the port that transmits the pulses from the crankcase to the fuel pump.
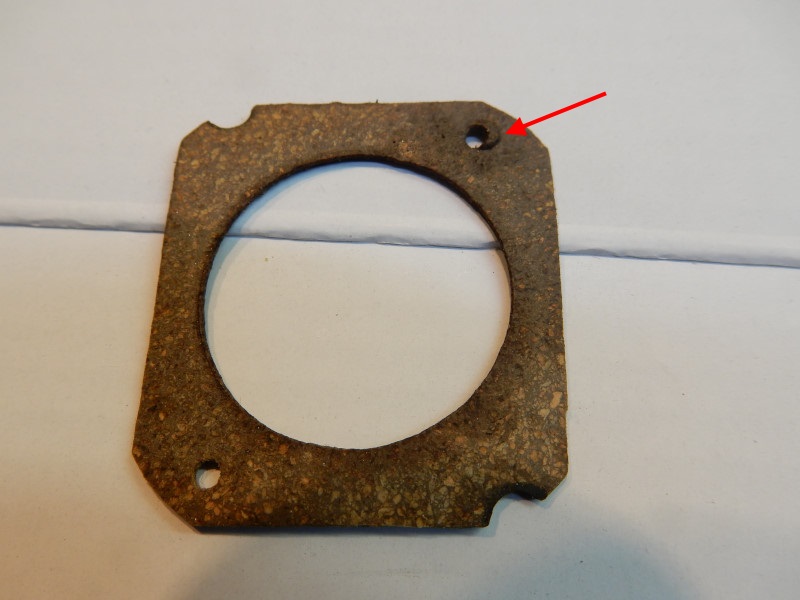
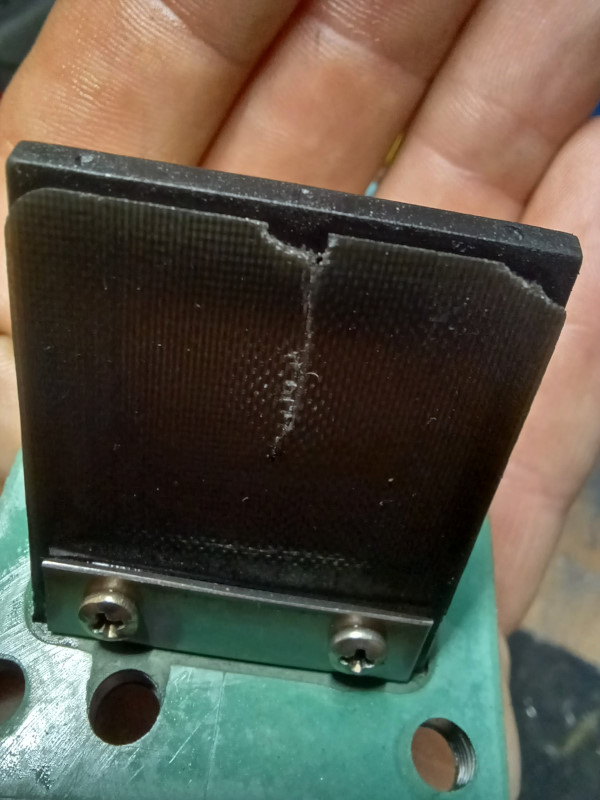
A telltale sign of an air leak on new or used engines is the presence of unburned oil around the carburetor-reed valve gasket. The suction of the carburetor and a partially working fuel pump will allow the engine to start and idle and maybe run to 1/2 throttle. If more fuel is required (and, especially, the engine is warming up), the pump will not deliver enough fuel to the engine – and die. A cold engine has a tighter fit. When it warms up, things expand and this increases the problem of a loose reed valve body. In addition, the pump will not work if the passageways to the crankcase are not sealed and clear of obstructions. If the carburetor gasket is put on backwards or upside down, the fuel pump will not work even though the engine may run, though poorly. In addition to this, Miniplane has been installing carburetor-reed valve body gaskets that have a gasket with a reduced diameter pulse port hole and which is also offset (see photo below).
Below is a photo of an OEM carburetor/reed valve body gasket from a brand new Top 80. The hole (red arrow) that connects the crankcase to the fuel pump is offset and smaller than the holes in the passageways between the carburetor and the crankcase. It is about 70% restricted and the crankcase pulses that power the fuel pump are too weak to the do the job. The machine at the Miniplane factory that stamped out the gasket did not have the correct dimensions. In addition, the reed valve body screws on the engine were loose. (See the Top 80 specifications page for the correct torque that should be applied to these screws.) The metering lever value was also incorrect. This brand new Top 80 would not run under high load – and wound up here in our shop. It also had other problems that compounded the faulty gasket.
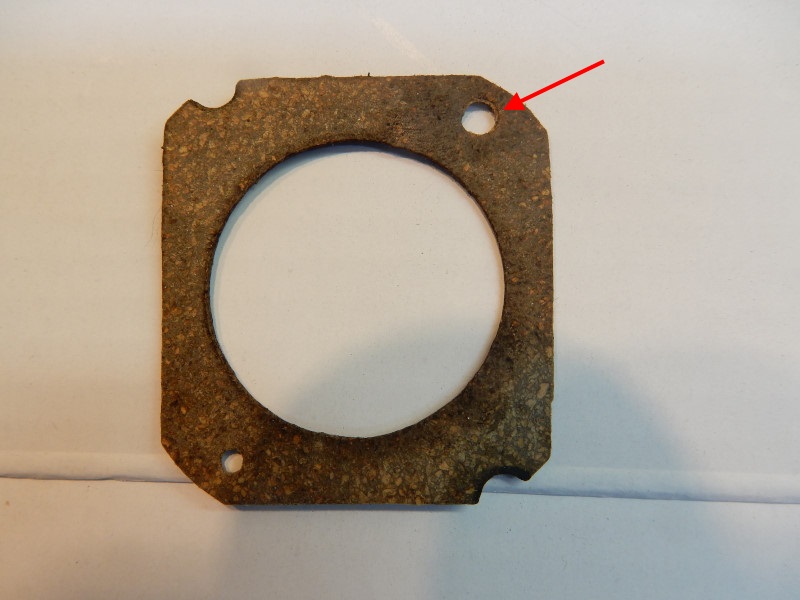
Modified OEM gasket. A leather hole punch was used to make the hole in the gasket the correct size. To prevent damage to the gasket, use a piece of masking tape to cover both sides of the existing hole and THEN punch the new hole. The punch itself tends to expand the outside of the new hole and may split the gasket if masking tape is not used.
If this test passes, continue the troubleshooting starting with section B below (ignition). If not, rebuild the carburetor (if you have not already done so) and run the tests above again before continuing with the "B" section below. However, you may need to run the miscellaneous tests below if the above tests fail.
9. Miscellaneous fuel system problems
Fading/stopping near/at full load in all engines
The primary cause of fading and stall is vapor lock. See
A weak spark can also have these symptoms but it is a less common cause than vapor lock. An engine with a weak ignition e.g., a bad spark plug or failed secondary wire will start and run in the midrange but fade near or at wide open throttle.
How do you tell whether it is vapor lock (or another fuel related problem) or an ignition issue? Fuel starvation will cause the engine to run hotter than normal while a weak ignition will not cause the engine to run cooler at the same throttle position. In other words, HOT engine = fuel starvation, COOL engine = weak ignition
An excessive carburetor ML value will also cause fuel starvation. (This assumes that the other parts of the carburetor and fuel system, in general, are 100% OK.) Even though the carburetor has been rebuilt or is new will not necessarily mean the ML value is correct. An excessive ML value will cause the engine to stall/fade when it is at 1/2 or more throttle. Sometimes, the engine will run just fine for 5 minutes and then slowly die. It is similar to an ignition failure. Be certain that your ML is set correctly. DO NOT ASSUME THAT NEW CARBURETORS HAVE THE ML ADJUSTED CORRECTLY. IT MUST BE VERIFIED IF THERE ARE ANY PROBLEMS WITH THE ENGINE. Remember that Walbro does not make these carburetors for paramotors and will do nothing to help either the manufacturer or the end user thanks to U.S. tort law.
The metering lever that is generally available in U.S. kits is adjusted for the tang-type ML diaphragm. Most diaphragms in the kits that are available to U.S. customers do not have the tang and must be adjusted to a different value.
Is the air filter free of all oil? An air filter saturated with oil can cause fade/stall at wide open throttle.
Fading at full load may also be caused less often by mechanical issues – see section C below.
Hard starting
This is usually due to a combination of high ambient temperatures and a hot engine which causes the fuel to change from a liquid to a gas, usually in the form of bubbles. These bubbles block fuel from moving through the carburetor, including the fuel lines. This is also known as vapor lock. If any part of the fuel system get near the exhaust system, the heat can cause vapor lock. High ambient temperatures also can cause vapor lock. A very hot engine will also heat up the carburetor to the point where fuel in the metering lever chamber will change into fizz or bubbles and evaporate after the engine is shut down. When this happens the engine must be re-primed in order to start. The only temporary fix for this cause of vapor lock is to let the engine cool off or douse the carburetor and fuel tank with cold water. The FSM developed by Southwest Airsports is a permanent fix to this annoying problem.
Midrange performance issues (excessive vibration from 4 cycling) in all engines
This problem is caused by too much fuel entering the engine via the low speed/idle circuit in the carburetor. It is relatively easy to fix but most do not bother and put up with the roughness and vibration in the midrange. The higher the altitude where the motor is run, the more annoying the problem. Here are the instructions on how to fix this. Having your motor purr in the midrange is a very nice feature, especially if you are flying a "C" class or better gilder which takes much less energy to fly than paramotor wings, especially reflex models. Having the motor purr at low RPM is a real bonus. Fixing this problem in the Polini Thor engines makes them the smoothest and quietest engines in the world but they do weigh more. The FSM is permanent solution to this problem and will be available soon.
No idle or erratic idle
If the carburetor has been rebuilt, the cause if likely a clogged exhaust system.
B. Ignition problems
Hesitation or the inability to reach full throttle may also be due to ignition problems, usually a defective secondary wire. Thankfully, ignition problems will not burn up an engine. Complete ignition failure will make the engine impossible to start or run. The ignition system can have a partial failure (loose connection or an erratic coil) which can cause fading at or near full throttle. Ignition problems (other than incorrect timing) will never cause an engine to overheat, thankfully. A common ignition problem is a transient wire connection of the coil to the engine ground or the coil to the magneto. Another common problem is a break of the internal wire going from the coil to the spark plug. Note: some engines e.g. the Moster 185, have the timing permanently fixed and will never have timing problems. Do not proceed with these tests if there any fuel problems indicated by the tests in section "A". It is a waste of time.
1. Spark plug
Generally, the first thing we always should do is to check the spark plug gap and/or replace the spark plug if there is any doubt as to its condition. I am still amazed at the number of engines that come in here which have the spark plug incorrectly gapped, sometimes 50% over specifications. It is impossible for the engine to achieve maximum output if the gap is too great or too little or if the plug is old/fouled. An incorrectly torqued spark plug will leak and reduce engine output at full throttle and can burn up the engine.
The Top 80 and Minari, among others, have "lawn mower" grade ignition systems which means that the spark plug gap on engines like this is unusually small, just 0.020" (0.5mm - 0.6mm). There will be no spark at full throttle if the gap is too great. The good news is that on more recent versions of their engines, Miniplane has upgraded the secondary wire assembly. It only took 10+ years for them to do this....
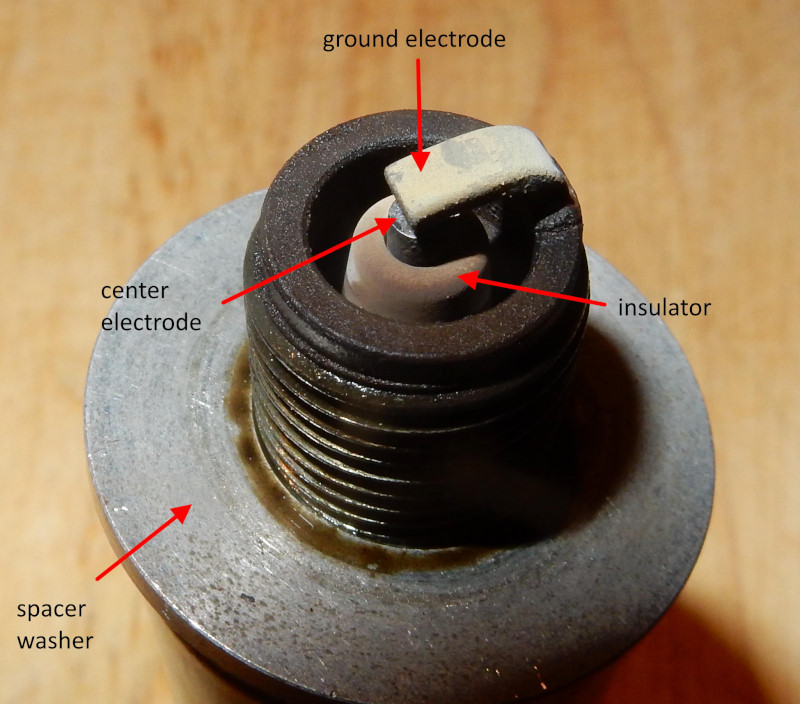
The plug must be torqued properly and the gap set to the specifications for your motor. An under-torqued plug will leak, maybe overheat the engine, and the high end performance of the engine will suffer. A leaking plug will have a black oily mess around the base of the plug. Be careful not to over-torque the plug as this can destroy the cylinder head. If the gap is too great, the spark will be quenched at high loads, the engine will misfire, and power will drop. Always be certain that the spacer-washer is installed with the spark plug if your engine requires it. If there is any doubt about the condition of the spark plug, replace it. Of course, how will you know how many hours the plug has unless you keep a log and have an hour meter/tachometer?
2. Quick ignition test
Do not perform the following tests unless the spark plug is NEW and CORRECTLY gapped. Spark plugs can look OK but not function, as the photos below demonstrate.
Remove the spark plug, reconnect it to the secondary wire, and lay the spark plug base on the cylinder head. Be sure that the spark plug is intact and has the correct gap. Place the paramotor in a darkened area and pull quickly on the starter. There should be a healthy spark between the center electrode and the ground electrode ONLY. If there are any signs of the spark moving along the surface of the center electrode insulator, the plug is fouled and must be replaced. (See second photo below.) Repeat the test with a new, correctly gapped spark plug.
If the above test fails (no spark at all), disconnect the kill switch wire which goes from the coil to the kill switch on the throttle. The kill switch wire to the coil connector is just a few inches from the engine-end of the throttle cable. If there is now a good spark, the kill switch wire circuit must be checked. If there is still no spark, perform the secondary ignition wire test to determine if the problem is fixable. Extreme humidity, allowing the engine to sit in rain, or submerging the engine in water can cause the ignition system to permanently fail.
Repeat the test above so that the engine is turned over 10-20 times or more. The spark must not change intensity. If there is any doubt as to the quality of the spark (or you do not know what a good spark is) perform the more advanced test in the next paragraph.
Purchase an ignition coil spark tester (a $10 tool from AutoZone) and set it to the 15KV range. Use a drill and a drill-to-socket adapter to turn the engine 400-600 RPM for at least 15 seconds. Using the manual or electric starter on the engine will not turn it long enough to perform an adequate test. Also, no electric starter should be activated for more than a few seconds to prevent overheating. There should be a consistent spark at the 15KV range. Note: it is important that the gap between the coil and flywheel be correct in order to obtain the maximum spark voltage when starting the engine. The greater the coil gap, the weaker the spark at starter speeds. If this test fails (no consistent spark), replace the coil but not before you make sure it is not a defective secondary wire.
Note: the coil can pass all tests and still not function correctly under various conditions such as full throttle or when it warms up. This is due to failure of the insulation inside the coil and/or moisture contamination. A megohmmeter can detect this problem. If you do not have one, we can test your coil for free if you pay return shipping. Contact us to do this.
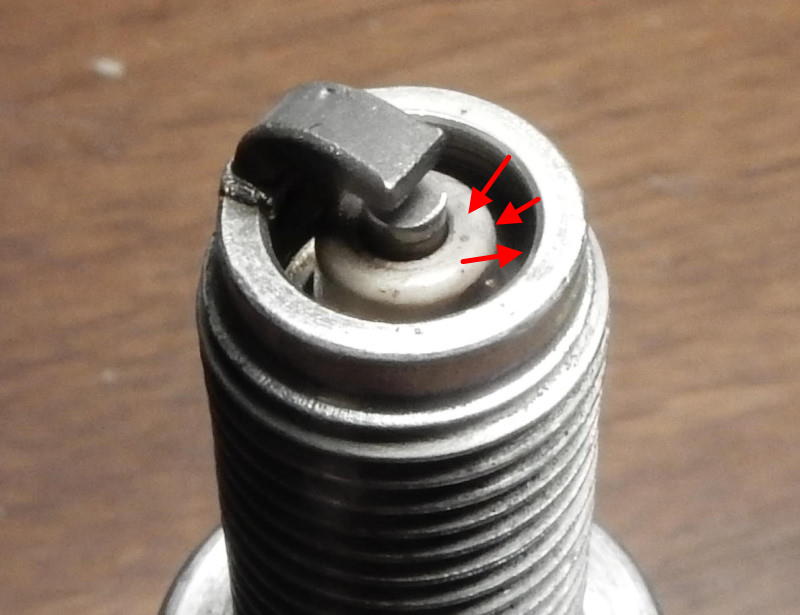
The photo below is of a spark plug in perfect condition shown by the light brown color of the insulator and lack of wear or fouling of the center electrode.
Fouling can be caused by excessive idle, contaminated or old fuel, improper types of additives, and/or attempts to clean the spark plug. You would never know it is fouled by looking at it, until the test is performed.
Instead of the spark going ONLY from the center electrode to the ground electrode, it can go from the center electrode OVER the surface of the insulator, down the insulator, and finally to the metal casing. The spark plug below had less than 2 hours on it and was from a NEW engine with only an hour or so of run time. I think that it became fouled with some conductive substance while the pilot was breaking in the engine or was an attempt to clean the plug. Taking any kind of metal brush to a spark plug will ruin it!
I asked the dealer who sold his student the engine but he claimed "I did not do anything!" I knew right away he was not telling the truth. The whole warranty repair that we did cost the distributor a bundle when it was the entire fault of the dealer who did not know what he was doing. It is just another reason to find a chainsaw repair shop. Nobody else knows what they are doing, especially most paramotor dealers.
The test above, however, does not check whether the timing is correct – a rare situation. We must only be concerned about the timing if the flywheel was ever removed.
If needed, go to the ignition troubleshooting page to perform additional and more thorough tests of the primary and secondary systems of the coil.
3. Coil contacting the flywheel
This is a rare problem. If the coil just brushes the flywheel, it will turn but the flywheel can short out the coil laminations which will affect the spark. It is easy to see if the coil is touching the coil and the engine does not have to be removed to do the test. Spray black paint on the outer edge of the flywheel as you rotate it. On the Top 80, remove the lower two muffler mounting button-head screws and you will get a clear shot at the flywheel. Other engines may require a bit more disassembly from the front. Let the paint dry and then slowly turn the flywheel by hand or with the starter. If the coil is too close, it will scrape the paint away.
4. Kill switch test
If you experienced sudden engine failure (not fading), the kill switch circuit could be shorting out.
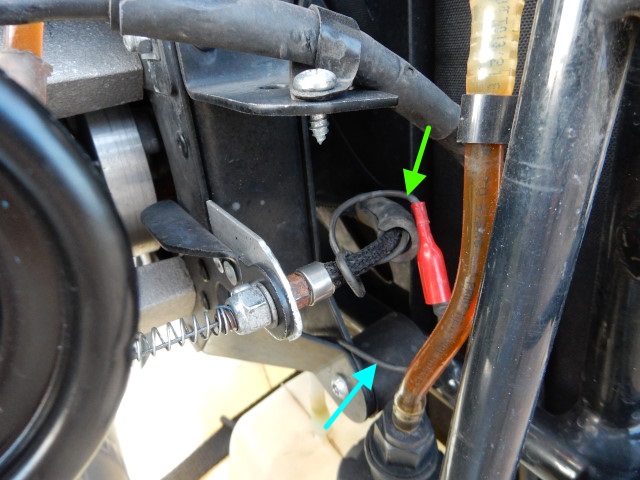
Top 80, others similar: The green arrow points to the kill switch wire going to the throttle and light blue arrow points to the primary wire that goes to the coil. Other engines are similar. These wires are just in front of the carburetor and next to the cooling box. The engine will stop if the primary wire is grounded. Sometimes, the wire going to the throttle will break or rub against the Bowden cable and short out. The switch in the throttle can also be bad. Separate the connection between the primary wire and the kill switch wire. Set the multimeter to "Ohms" and its lowest range. Connect the red lead of the multimeter to the terminal inside the red boot (others similar) and the black lead of the multimeter to a fin on the engine. Use some test leads to help unless you have three hands. The kill switch lead should be "open" – no resistance. Now press the kill switch a few times. Each time you press it, the resistance should be less than 3 or 4 Ohms. If it is any other value, you will need to find out why. Usually, the wire is either defective or broken. Go to the kill switch page for more information on how to fix these problems.
C. Mechanical problems
Note: Most shops do not have the tools or know-how to perform mechanical repairs on paramotors, especially adjusting the timing or replacing the ignition coil. Those who service racing two stroke engines, like dirt-bikes and racing karts, are the best bet and probably have the necessary tools.
It takes about $400 of special tools to service every part of a paramotor. Thankfully, most pilots will only need a modest tool set that costs a fraction of this.
1. Reed valve
If the reed valve is not 100% in working order, the engine will not achieve full power nor start easily, at the least. If the valves petals are warped, chipped, broken, or missing the engine may not even start much less run. A quick check can be made of the reed valve by removing the carburetor and looking to the reed valve with a bright flashlight. If anything looks amiss (holes, missing pieces, etc.), remove the reed valve for a additional examination.
Below is a reed valve where one of the four petals had completely broken off. This engine would not even start. A clogged muffler can cause the reed valve to fail in this manner. Photo courtesy of Tom Bird

This is the typical fault of a reed valve petal. It mostly works but idle and the top end are compromised. Photo courtesy of Tommy Galis.
2. Poor idle
Poor idle can also be caused by clutch drag. Also, it is impossible to adjust the idle correctly if the clutch drags.
If cheap gasoline is used, run ordinary fuel injector/carburetor treatment like Techron through the fuel system. Pilots would be amazed at how much goo builds up inside a carburetor and effects the idle.
3. Loose cylinder head
Sometimes, the factory or pilot fails to properly torque down the cylinder head.
Warning: all new paramotors must have the torque of the cylinder head nuts checked after the first ten hours of use or whatever is noted in the engine manual.
A more serious cause of a cylinder head loosening is the use of inexpensive gasoline which causes fuel mixture pre-ignition (knocking). Using premium gasoline will eliminate the cause of this problem. However, those who purchase service station premium grade gasoline may not be getting high octane fuel unless it is purchased from major refiners e.g. Chevron, Shell, BP, etc. Note: Always put a gallon of premium gas in your vehicle FIRST and THEN fill your portable fuel tank. You must purge the regular fuel out of the fuel delivery system of the service station if it uses but one hose for all grades of gasoline.
To tighten the head, remove the cooling air duct/shroud (if present) to access the cylinder head nuts. Be sure they are torqued to the correct value. Tighten the head nuts in a cross-pattern to the final torque value for your engine.
4. Leaks
Check the space between the head and the cylinder for any leaks (the presence of oil that is usually black in color). A leak indicates that the head gasket is faulty and should be replaced. NEVER REUSE A HEAD GASKET. I am still amazed at how some DIY's mangle simple things like a head gasket. Don't risk harming your engine. If you are going to do your own service, get the necessary parts and tools to do it right. Engine leaks are common and are rarely serious except between the cylinder and the head. Note: A leak can originate at one point and air passing rapidly over the engine can move the evidence around to somewhere else.
If you think you have a leak, first thoroughly clean the engine then run it an hour and see if you can pinpoint the leak. If the leak is black and gummy, it is a leak after the fuel/oil mixture is burned. If the oil is clear in color, it is a leak BEFORE the mixture is burned. For example, leaks between the cylinder and crankcase will have oil that is clear in color because it has not been burned yet. Leaks between the cylinder and head will always be black in color. Carburetors on 2 stroke engine will always leak clear oil some – it is impossible to prevent.
5. Compression
Verify engine compression. All it requires is less than a minute of running without oil in the fuel and the top end of the engine is ruined. If compression is low, there are serious mechanical problems and the engine must be rebuilt. Overheating the engine, even briefly, can burn the lubricating oil and cause the piston ring to stick to the lands. This will ruin the cylinder. Note: engines with decompression ports will give compression values much lower than expected.
6. Carburetor gasket in the Top 80
This is discussed in A.6 above.
7. Timing and coil gaps
The ignition timing and the coil gap must be correct. If the flywheel and coil have not been removed or loosened, these should never require any attention or adjustment. Otherwise, pilots should send their engines to competent mechanics to have these values checked and adjusted if they cannot do it themselves. These are rare conditions that, ordinarily, will not need to be checked. The coil gap can be way off and the engine will still run but it may be harder to start.
8. Cooling
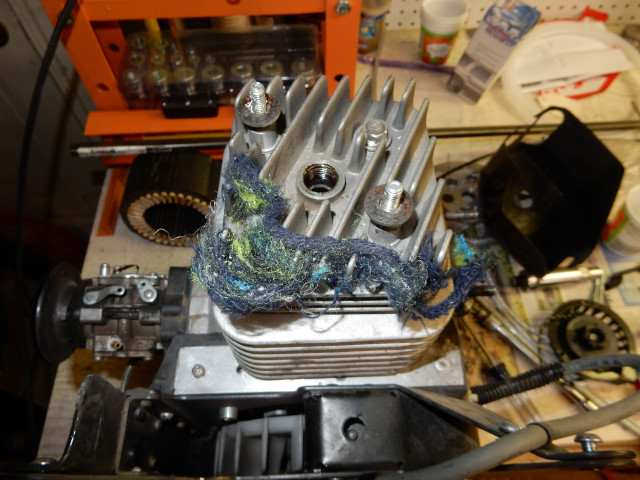
The cooling system should be checked to be sure there is nothing clogging it. If it is clogged, the engine will run normally but tend to overheat, especially at high loads. Some engines do not have forced air cooling, like the Simonini, Vittorazi, and Minari. Their cooling system will never clog. The Top 80 below had a slight problem.
9. Clogged muffler
The muffler can become clogged with soot (thank you, Bill Stoll, for this tip) or the internal perforated pipe may loosen or break apart and tear up the fiberglass packing which can block the exhaust stream. This will affect engine output and idle. It is easy to do a visual inspection of the muffler to be sure the internals are in order.
![]()

