


Engine, exhaust, and redrive oil leaks
by Had Robinson
updated June 16, 2022
Locating leaks Exhaust system holes & leaks Crankcase leaks Redrive leaks
See this page for reed valve body leaks.
Discussion
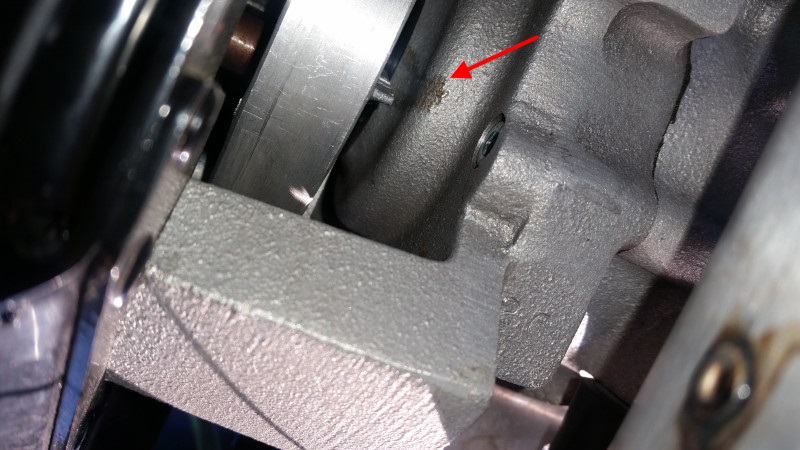
It is the nature of (2) stroke engines to “spit” fuel/oil from the throttle and choke shafts on the carburetor. Drops of oil form where these shafts exit the carburetor body because the gasoline evaporates, leaving only oil. When the drops get big enough, they go somewhere – and it can be anywhere. Often they fall on the muffler and stain it. They can also splash on parts of the engine which I think has happened here in your photo. The air is moving everywhere around the engine and drops of oil can land anywhere.
In a word, (2) stroke engines are messy. Pilots can always apply a degreaser and then wash them down to clean the mess off that accumulates but I do not recommend it often because the water gets inside the propeller hub and, when necessary, makes removing the hub difficult, even with heat, because of the formation of rust. Where it is extremely dry (desert), it’s not a problem but everywhere else, it can be. If you must remove the oil, use a rag soaked with mineral spirits.
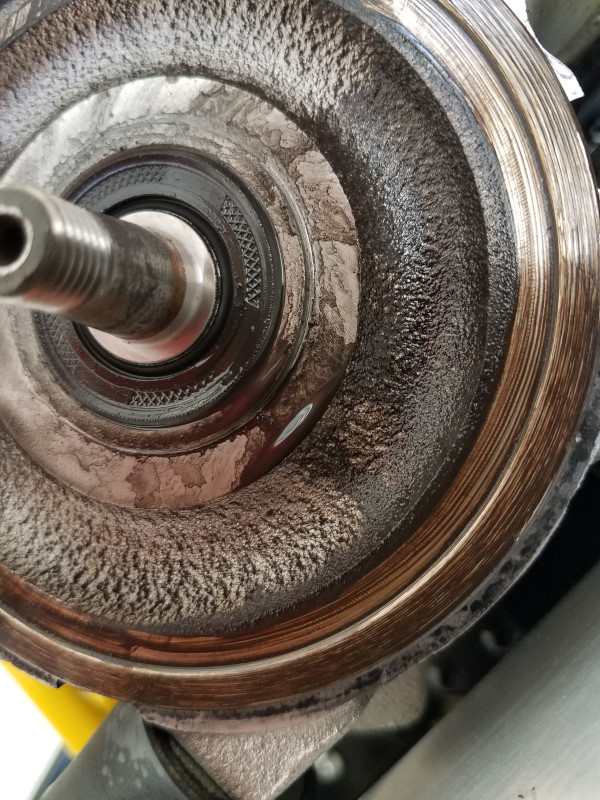
Here are two photographs of oil leaks. The first photo of a leak is of no consequence and is not likely to be a leak from the crankshaft seal. It is not necessary to fix minor seal leaks involving a few drips. However, the second photo is of a serious leak of the crankshaft seal on the clutch side of the engine which should be fixed. With the proper tools, this seal can be removed without disassembling the engine.
A. Locating leaks
It is much easier to detect the source of the leaks if the engine has been cleaned thoroughly. Oil tends to move downwards and back on the engine surfaces. This is due to gravity and air moving past it.
Oil leaking from the engine crankcase or the redrive (if there is one) will be the same color as the oil used in the fuel mix, not black. A leak in a crankshaft seal is not as common as a leak in the redrive seal or from the redrive fill plug. As the oil from both the redrive and the engine has not been burned (run through the engine), it is hard to tell them apart. The easiest way to tell the difference is to remove the redrive and pressure test it (about 5 psi) or to heat it with a heat gun (see test with pressure on this page). If there are no leaks in the redrive, the source of the leak is likely a bad crankshaft seal. Leaks in the redrive must be repaired promptly.
A leaking crankshaft seal is not worth repairing unless it is more than a few drops every time you fly. The oil will typically appear at the lower joint of the redrive (Top 80 – others similar) and the engine crankcase. However, more than a trace of leakage can wind up in the clutch and cause it to slip. Clutch slippage is more an annoyance than a problem.
Black oil leaks in any engine also indicate an air leak. That is, there is both PRESSURE and SUCTION in the exhaust stream up to the muffler. If oil is coming OUT then air is also coming IN. An air leak will cause the engine to run leaner and, in certain situations, can cause it to overheat and seize. It is another reason why pilots should never attach smoke devices anywhere on a 2-stroke engine except at the muffler. The smoke fluid (unlike in a 4-stroke engine) will get into the cylinder to be burned and can overheat the engine.
B. Exhaust system leaks
Exhaust port oil leaks
Note: if the exhaust port leaks but a few drops now and then, this is not important.
If the oil from the leak is black and icky, it is a leak from the exhaust port (most of the time) or from the cylinder/head joint (rare). The oil gets black from having been burned (run through the engine). The most common area of black oil leaks is just below the exhaust outlet on the cylinder and/or at the top of the muffler. Below is a photo of the exhaust port on a Top 80. NOTE: the exhaust springs are missing in order to correctly seat the gasket. On any engine, a correctly installed exhaust gasket will not leak oil.
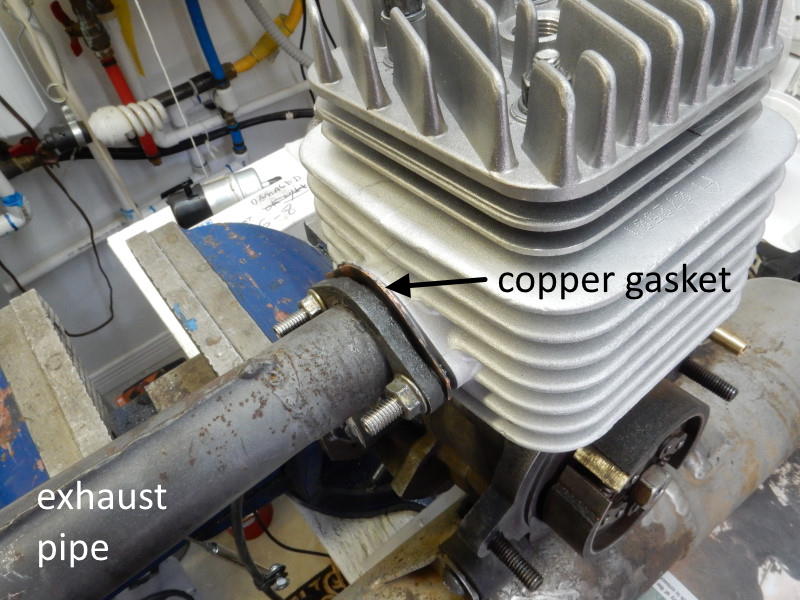
The exhaust port gasket and springs are critical to sealing the exhaust system in the Top 80. If the springs are not tightened properly or the copper exhaust flange gasket is damaged/missing/deformed, there will be black oil in the area. It can also get on the propeller and/or into the redrive. Go to this page for detailed instructions on how to correctly tighten the exhaust port nuts/springs or install the exhaust port gasket on the Top 80. If the installation is not done correctly, the exhaust port is guaranteed to leak oil. It is not as simple as it looks.
Polini engines Even with care, the exhaust flange gasket may disintegrate over time from the heat at the exhaust port. The heat can eat away at the copper materials in the gasket as in the Polini Thor. The gasket will leak no matter how carefully it is initially installed. We just have to replace the gasket and write it off to normal wear and tear. A good time to replace the gasket is when the top end of the engine is repaired/replaced. Remember to thoroughly clean and degrease the area. Use gray RTV to seal the gasket (a 1/4" (6mm) bead or more should be applied), red threadlock on the studs and nuts, be certain to tighten the nuts to the specified torque. The side of the gasket with the greater metal-faced area goes away from the cylinder head.
On the Top 80, over-tightening the exhaust springs to "stop a leak" will ruin them and cause premature wear of the copper exhaust flange gasket. On other engines, it is likely that the nuts which tighten down the exhaust flange to the cylinder head did not have threadlock applied nor were they tightened to the proper torque. Once the gasket starts to leak, it must be replaced as no amount of torque or sealant will fix it.
Exhaust system joint and hole leaks
If you see any signs of oil around the exhaust system joints (NOT at the exhaust port), the O-rings are bad. Most Top 80 exhaust systems have (2) joints sealed with O-rings. Some newer models, however, do not have an O-ring in the smaller top joint which, generally, will never leak unless the springs are defective/weak. Leakage of these joints allows air into the engine fuel stream which may lean out the air/fuel mixture and potentially burn up the engine. The small upper O-ring disintegrates after about 100 hours, depending on the type of fuel used. Note: some Top 80 mufflers have (2) upper O-rings. Replacement O-ring sets (upper and lower) are available from Miniplane-USA.
This Top 80 model does not have an O-ring in the top joint yet should not leak.
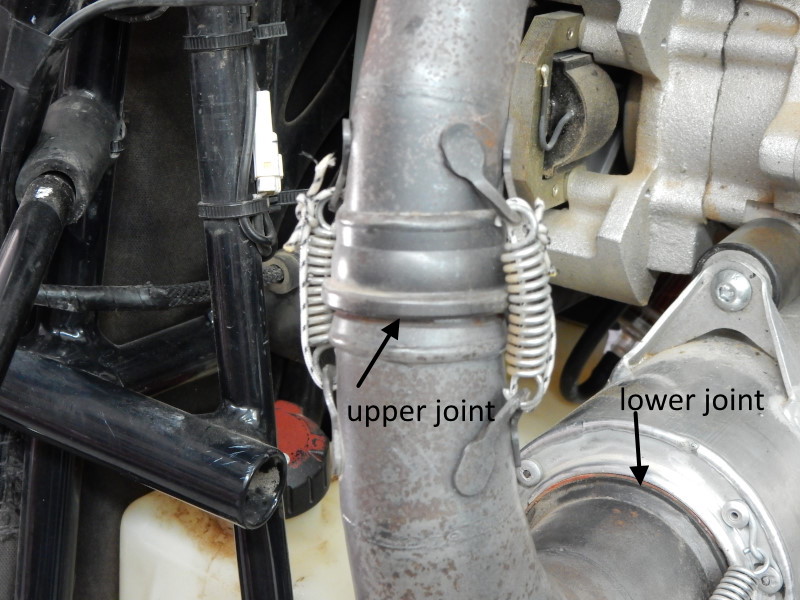
This exhaust system has O-rings in both joints. On some models the upper joint can have (1) or (2) O-rings.
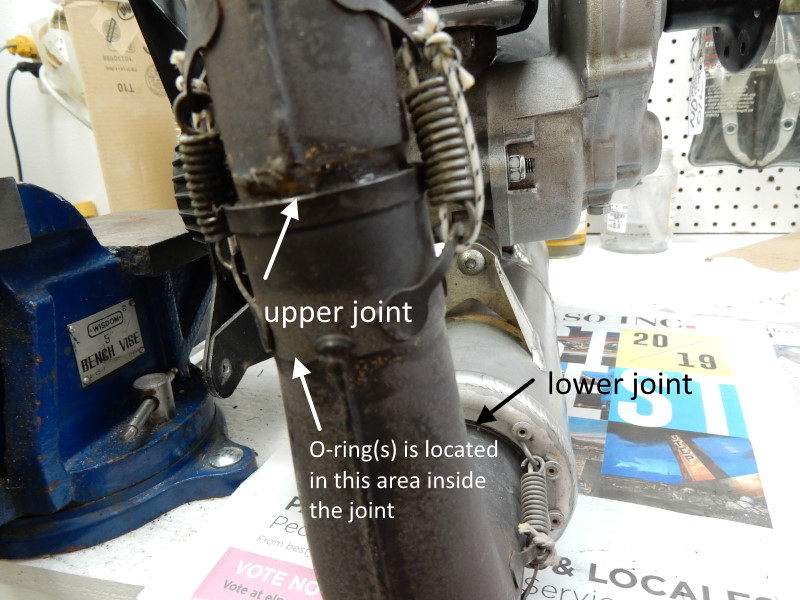
The larger muffler O-ring rarely, if ever, goes bad.
Remove the exhaust springs with a line. If tools are used, the springs will be ruined. Here is a video on how to properly do it. Note how Dyneema line was used to contain the springs in case they break. You do NOT want spring pieces to get into the propeller (the place where everything goes that gets loose on a paramotor).
When replacing the O-rings, remove all traces of gunk and the old O ring from the female part of the pipe before installing the new one. Thoroughly clean the grooves that hold the O-ring with brake cleaner and compressed air. The O-rings are best installed with silicone grease (ordinary grease cakes up when it gets hot). If silicone grease is not available, use 2-stroke oil. Smear the O-ring with the grease and work it into the groove in the pipe. Rub grease around the tip of the male section of the pipe. The sections must be brought FULLY together. Gentle twisting helps. Reinstall the springs with a new Dyneema line and fix the knot with Super-Glue.
Holes in muffler
The Top 80 muffler (some others similar) has an outer aluminum shell with an internal steel baffle attached to the outer shell with (3) 3/16" aluminum rivets around the circumference of the shell. Vibration from the engine stresses these mounting rivets and, after a while, the steel baffle will shear off the mounting rivets and the rivets will fall out, leaving holes in the outer shell. These holes will leak air and lean out the fuel/air mixture. They should be repaired with new rivets.
It is possible but unlikely that the outer shell and the baffle are not aligned. Look carefully at the outer hole and the hole in the steel baffle should be just below the outer hole. If the two holes are not aligned, use an icepick or a small drill bit to align the holes. The aluminum rivet may then be inserted and the job completed.
C. Crankcase leaks
Sometimes, the factory or a pilot does not assemble the crankcase properly, leaving out or misplacing the RTV sealant. The photo below is of a Miniplane Top 80 that has a serious leak. Soap solution was used to illustrate how bad the leak is (red arrow pointing to bubbles). The engine will have to be completely disassembled in order to fix this, caused by poor QC at the Miniplane factory. A leak like this will affect the fuel/air mixture.
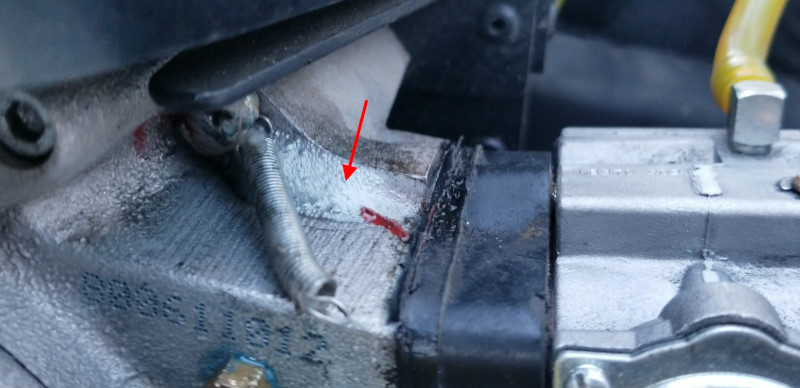
Photo courtesy
of Jay Wildman
If it is not obvious where the leak is coming from after careful examination of the engine, pressurizing the crankcase with no more than 3-5 psi of air can help.
Go to this page for instructions on how to do the leak test.
Replacing the engine seals is not difficult. However, if one is failing it may be due to excessive wear of a main bearing. Engines with more than 200 hours should be overhauled if one or both of the main seals are leaking.
D. Redrive oil leaks
Some redrives operate in an oil bath like the Top 80 or the Polini Thor models. If a Top 80 has light-colored (not black) oil around the base of the engine, on the redrive or muffler, it is a leak in the redrive seal or, much less often, a leak in the redrive housing itself. The Thor models have a wet clutch so the redrive oil quickly becomes black. If there is black oil around the propeller shaft, there is a leak in the propeller shaft seal. Redrive oil of a Top 80 falling on the muffler, however, may become black in color from being burned.
An easy way to check for leaks in the redrive is to take a heat gun and heat up the redrive quickly. (If pressurizing a Top 80 redrive, see the Top 80 note below.) This will pressurize the air inside it safely and heat up the oil. Alternatively, use regulated air (no more than 3-5 psi) to pressurize the redrive through the fill plug. Submerse the entire redrive in a bucket of water except, of course, the area around the fill plug. Water will not hurt the redrive and you can detect very small leaks e.g. around the clutch bell shaft without having to guess the source of the leak. After you do a water test, it is a good idea to change the oil in the redrive if you have any doubts that you failed to maintain pressure inside the redrive at any time while it was submerged in water.
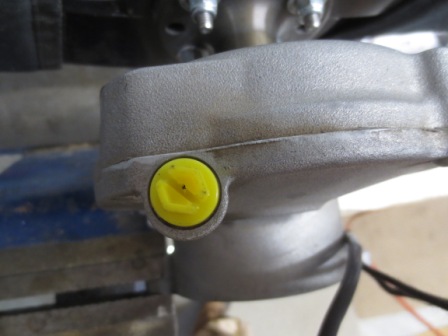
Top 80 The yellow seal plug must be installed for this to work. The standard fill plug is used, it will automatically relieve the built-up pressure inside the redrive. The oil will leak out of the smallest crack. If the seal behind the clutch bell is leaking, it will take a few minutes for the oil to run down inside to a place where you can see it.
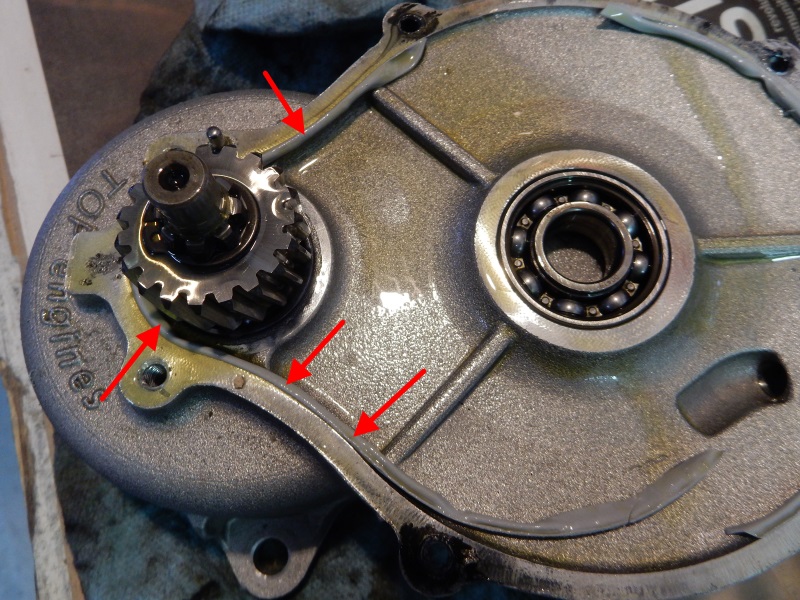
Below is an example of a new redrive (Top 80) that was assembled without sealant applied between the case halves. Whoever assembled the redrive at the Miniplane factory missed the mating surfaces of the cases halves, applying the sealant where it was useless. Did the tech have too much to drink that night before? Is there any sort of quality control at Miniplane? Who knows.... Unfortunately, the poor pilot who purchased the engine thought either his fill or drain plug was leaking and tightened them more which, of course, had no effect. He sent me the redrive and I pressure tested it. The oil came pouring out between the case halves (photo below). It was a huge headache for the pilot. Depending on the ambient conditions, this type of leak can sometimes be hard to detect.

Opening up the redrive, it was obvious why it leaked. The red arrows in the photo below point to where the factory technician missed the edge when applying the sealant and it wound up in the cavity where it was useless. This is not the first time that I have discovered sealant in the wrong place in a new redrive. Note: special bolts are needed to split the redrive case as well as a hydraulic press. See the redrive rebuild page for how to do fix this problem.
See the Top 80 redrive rebuild page or the Polini Thor redrive rebuild page on how to properly rebuild or repair a gear type redrive.
Top 80 fill plug relief valve issues
Note: The Top 80 redrive will leak and even blow out the RTV sealant between the case halves if the fill plug relief valve is clogged or jammed. This valve MUST function properly!
Before you take things apart, check to be sure the fill plug is not the problem. An easy way to check the valve relief pressure is to use a pop-off gauge. The plug is actually a low pressure relief valve (1.5 psi) that uses a spring loaded ball pushing against an orifice. The ball can become stuck or jammed over time preventing the relief of pressure buildup inside the redrive. Pressure can increase enough to force oil out through the seals or from between the case halves. The increase in pressure can be caused by running the engine at full load (it heats the redrive up more) or flying to high altitude. The seals in the redrive are not pressure seals but ordinary shaft seals which is why they can leak under certain conditions.
It is easy to fix the jammed fill plug/relief valve. Cut the tip off a wood toothpick and run it into the hole in the bottom of the plug pushing the ball back and forth. You can tell right away if the ball is jammed. Put some penetrating oil down the hole and then use air pressure to blow the penetrating oil through the entire relief valve. Doing this a number of times will thoroughly clean out the valve.
It is a good idea to check that the valve is not jammed every time you change the redrive oil.

If you are a heavy user of your Top 80, you might want to consider doing away with the factory supplied plug. Pilots who climb quickly to high altitudes or run at full power in hot climates may find that cleaning the relief valve/plug is insufficient to prevent oil leaks. When the pressure in the redrive is greater than outside, the pressure will also tend to force the seal tighter on the shaft – this excess pressure will wear the seal out faster than normal. This is because the OEM seals used are not pressure-type seals. Miniplane uses this relief valve/plug so that the motor can be stored in many positions without loss of redrive oil. The vast majority of users, however, keep their paramotor in an upright position. If you ship your Miniplane, for example, you can use the original plug instead of the relief valve.
To prevent relative pressure build up in the redrive, use the plastic plug that was shipped with your Miniplane. To make the plug a "breather" type, drill a tiny hole in the center of the plug with a #60 drill or the smallest bit you have. The small hole will let the redrive breath but keep most dust and contaminants out. The modified plug will keep the pressure the same inside and outside the redrive at all times. The downside is that it is much easier to have an oil spill if you lay the engine down so that the top of the redrive slopes downhill. It will slowly drain out and make a mess on your harness. When you transport the engine, it is a good idea to put an unmodified plastic plug or the relief valve in the redrive in order to prevent spills.
![]()

