


Kill switch problems
by Had Robinson
updated August 11, 2023
The failure of the kill switch (the red button on the hand throttle) is more than just a nuisance, it is a safety issue, as well. See section C. below for how to do a quick test and how to fix a failed kill switch.
The photos and information below refer to the Miniplane kill switch. Other makes are similar.
A. How it operates
The principle of the switch is to ground the primary winding of the ignition coil which will kill the spark and stop the engine. The actual kill switch is a simple button. Though cheaply made, it is relatively immune from failure.
The circuit uses the steel Bowden cable that runs to the throttle as the ground wire. The kill switch wire connects to the primary winding of the coil and enters the wire loom near the throttle cable's connection to the motor frame. It then extends up to the hand throttle between the loom and the Bowden cable. The wire enters the throttle and is soldered to one of the terminals on the kill switch. A wire runs from the other terminal on the switch to the end of the Bowden cable inside the throttle. It is secured to the Bowden cable by a narrow piece of polyvinyl tubing. The connection is not particularly sound but it works.
Some paramotors do not use the Bowden cable as a ground but add an additional wire to the throttle cable that is connected to the engine or the frame.
B. Points of failure
a. Coil primary wire
Refer to the Primary wire test in order to check this. If the primary wire is broken/disconnected inside the coil, a new coil must be installed.
b. Kill switch
Only rarely is the kill switch in the throttle handle defective. It is easy to test with a digital voltmeter. Disassemble the throttle handle by removing all of the screws and carefully opening just the kill switch end. Using test leads, connect the leads from the digital voltmeter across the switch and measure the resistance while pushing the switch and releasing it. The resistance should go from a few Ohms to infinity, respectively. If it is defective, it will have to un-soldered and a new switch installed. These switches are common-sized and are available on eBay and places like DigiKey.
c. Bad/missing ground at the throttle end or at the engine frame.
The symptom of a defective ground is that the pilot may feel a small electrical shock or tingle when touching the hand throttle or the throttle cable if the engine is running.
The short piece of wire from the kill switch to the Bowden cable can become disconnected from the Bowden cable at the throttle. The throttle will have to be disassembled to fix this.
The engine and frame must be electrically connected together. This is because the throttle cable is usually connected to the frame and not directly to the engine. Rubber mounts are used to attach the engine to the frame and this electrically isolates the two. Most paramotors have a wire that connects them. If your paramotor does not have this wire, it is a good idea to make one up so that the engine and frame have a solid electrical connection with each other. Various metal items such as the metal cable from the throttle to the carburetor throttle valve may connect the two but they are not reliable sometimes.
d. Defective throttle cable wire
The most common failure of the kill switch circuit is a defect in the kill switch wire itself.
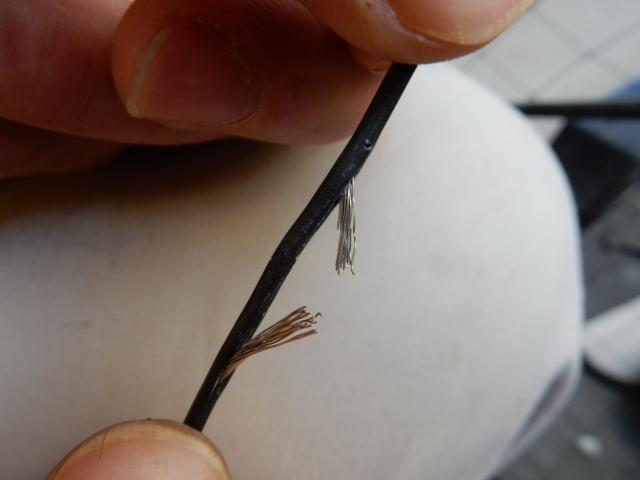
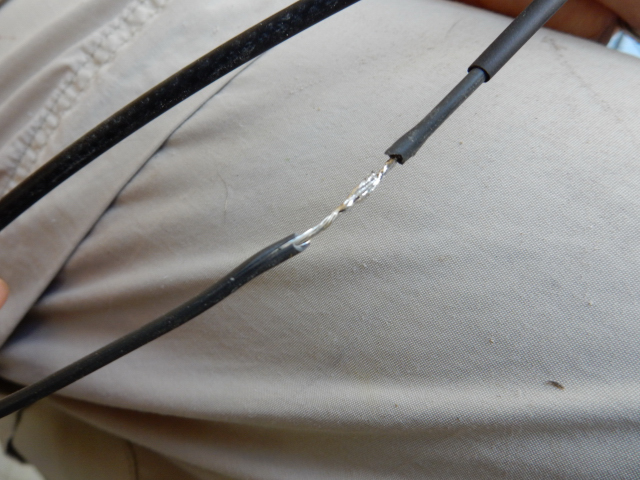
This is the kill switch wire from a Miniplane with less than (10) hours on it. We could feel the break in the wire, which was about a foot from the throttle. We sliced the insulation open and exposed the broken ends which, for a time, worked until they separated only a tiny bit due to the normal stretching or pulling on the throttle cable.
This continues to be a quality control (QC) issue with the Italian manufacturers. During manufacture, the stranded wire was stretched to the point of breaking or the wire was pulled over a sharp object essentially cutting it as the outer insulation was being applied. Our experience with this suggests that it seems to happen in batches. One pilot's new Miniplane had (2) separate breaks in the kill switch wire. What is particularly annoying is that the circuit will work for awhile because the broken ends of the wire will touch. However, when the throttle cable is moved repeatedly, it will stretch a small amount which is just enough to cause the circuit to fail. The pilot has no warning except when he attempts to shut off the engine.
To improve safety and convenience, it is highly recommended that all pilots install a choke control or an emergency kill mechanism if there is not already one installed.
If the motor is new, a warranty replacement of the entire throttle cable can be done. If your kill switch has failed and you are past the warranty period, plan on spending at least an hour to fix the problem. Having the right tools is essential.
e. Frame attachment point for the kill switch circuit
The second most common point of failure is where the throttle cable attaches to the engine frame. Miniplane, for example, recommends that the cable not be connected tightly so that it can move. Unfortunately, rust and grime will spoil the connection between the throttle cable and electrical ground. The result is that the kill switch will work intermittently. It is a trade-off. I suggest that pilots firmly tighten the nuts which connect the throttle cable to the frame.
Below is a Top 80 that had intermittent kill switch failure. It was traced to the rust around the (properly) loose fitted cable connection. Tightening the nut securely eliminated the problem. Make sure that the cable is lined up properly if you tighten this fitting. For the best solution: add a second thin nut to the end of the fitting and install an electrical ring connector with a wire to a fitting on the engine between the two nuts. Then you can keep the throttle cable a tiny bit loose so that it can rotate.

f. Damage to the cable and the enclosed wire
Miniplane does little to protect various parts of the paramotor from normal wear and tear. This includes the throttle cable.
With normal use, the cable will rub on various parts of the frame. If the cable has not been protected at these contact points by wrapping it with electrical tape or a piece of split hose, the kill switch wire can short to ground. This will cause an engine shutdown at unexpected times. In extreme cases, the cable itself can wear through to the inner wire and the throttle can jam or cease to function
Carefully examine the entire length of the cable for damage. Apply tape or hose to those areas where the cable rubs any part of the frame.
C. How to fix the kill switch wire
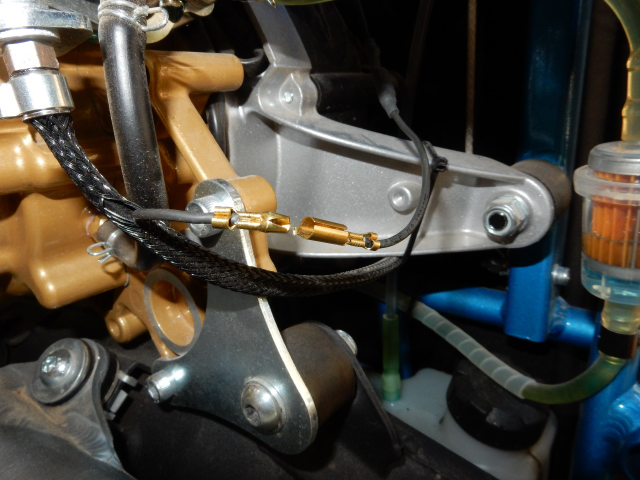
To easily tell what is wrong, separate the connector where the kill switch wire enters the throttle cable at the frame end. With the engine running at idle, touch the connector that goes to the ignition coil to a ground point on the engine. If the engine stops, you know your kill switch circuit (what is in the throttle cable) has a problem. You can use a short test lead to do this. At this point, you must disassemble the cable. It requires quite a few tools and some quality #18 wire (available from auto parts stores). If you not know how to solder, you will need some "red" butt connectors and a crimping tool (available from Harbor Freight). Remember: you must use quality wire. The throttle cable shakes and flexes constantly when in use and cheap wire will fail quickly. Quality wire is made up of many very thin wires instead of a few thick wires and why quality wire costs substantially more.
Because there may be multiple breaks, I recommend that the entire wire be replaced.
If you do not replace the entire wire, carefully check the full length of the wire for breaks. Where there is a break, the wire will easily bend sharply.
1. Items needed
- 3/4" heat shrink tubing (HST) for newer models that have the new style kill switch. (available from Harbor Freight)
- #18 gauge hook-up wire (use ONLY quality hookup wire.)
- soldering kit or "red" butt connectors and a tool to crimp them Note: the Chinese made connectors from Harbor Freight are garbage. Get good ones from the electrical department at Lowes or an electrical supply house.
- right angle pick tool (available from Harbor Freight)
2. How to fix
Remove the shrink wrap from the connectors and separate the ends (see the photo below). This is where the kill switch wire goes into the wire loom covering the throttle cable. If you are handy with a digital voltmeter you can find out if you have a break in the kill switch wiring or if it is a problem with the button switch. The wire going into the cable should connect to ground when the kill switch button is pressed.
In order to repair/replace the wire you will have to remove the compression ring that holds the wire loom to the end of the Bowden cable fittings. In order to repair/replace the wire, remove the ring at the carburetor end. The rings can be re-used if you are careful. If they do break, you can go to a bike shop and have them apply new ones.
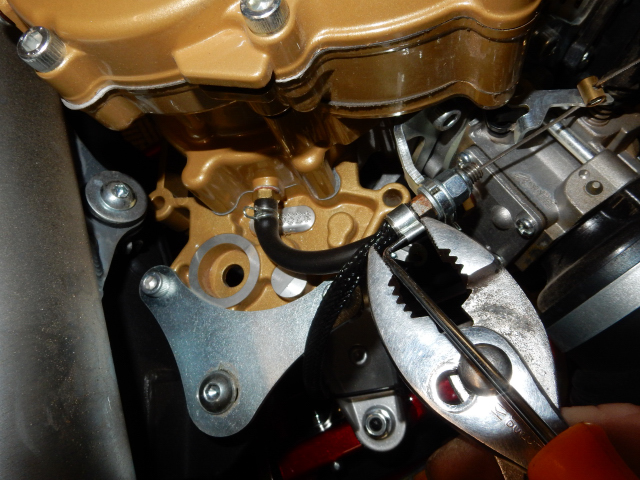
You can insert a right angle pick (available from Harbor Freight) into the small hole where the ring is compressed. Using a pair of pliers, you can force the pick into the hole and it will spread the compression area just enough to remove it. Be sure to force the end of the pick into both sides of the ring. To re-affix it, just squeeze the ring tight with a pair of wire cutters. Do not squeeze too hard or you will cut right through the ring material. You can re-use the compression ring repeatedly if you are very careful not to stretch/squeeze it excessively. Alternatively, you can purchase the special tool which clamps down the ring but this is the only way I know to release a ring for re-use.
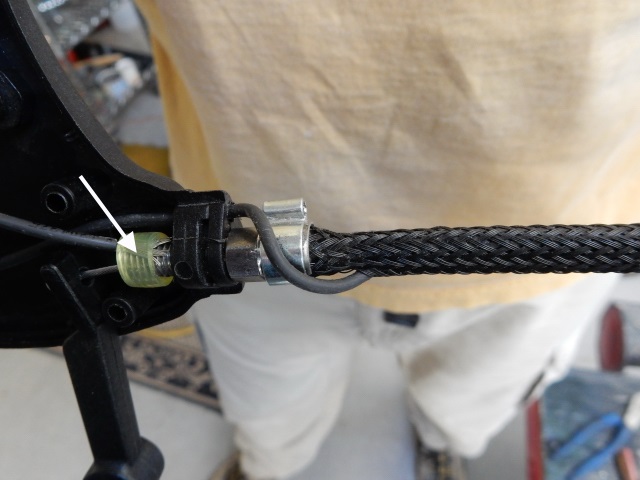
The small piece of vinyl tubing that holds the other wire from the switch to the fitting on the Bowden cable is visible in this photo. The other wire from the kill switch must be firmly connected here or the kill switch will not function.
The loom can now be pulled back and the kill switch wire removed from the throttle cable assembly and examined. Breaks can often be manually felt in the wire. The best way is to connect a digital voltmeter (in resistance mode) to each end of the wire and measure the resistance. It should be less than a few Ohms. Now, stretch the wire. If the resistance goes to infinity, it is obvious that the wire is defective and must be replaced or repaired. I do not recommend a repair because there may be other areas of the wire that are ABOUT to fail and fixing just one area will be a waste of time.
However, we got ambitious with this wire (below) and repaired it anyway. So far, the repairs were sufficient and there were not any additional defects in the wire. The pilot and I stripped the bad ends back a bit, slipped on a piece of shrink-wrap, soldered the ends together, and then slid the shrink wrap over the joint and applied hot air from a heat gun.
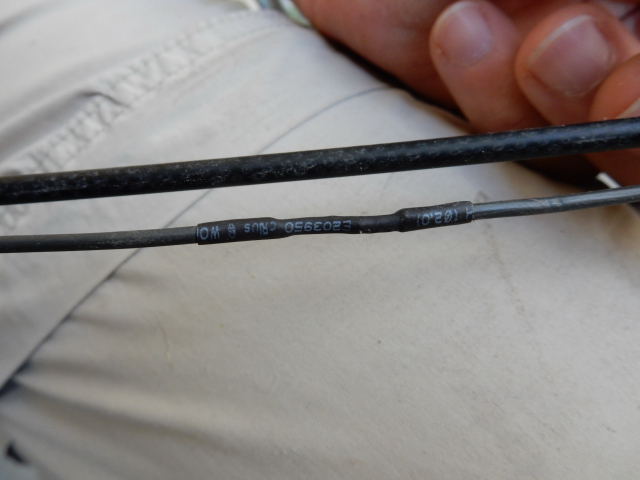
The completed repair.
Use a digital voltmeter to check the kill switch circuit after you have made any repairs. Reassemble everything, including the shrink-wrap which holds the kill switch in place on newer models. The shrink-wrap, however, is optional and is merely cosmetic.
![]()

