
Finger screw and starter pawl removal and assembly
by Had Robinson
Special materials needed
- Replacement finger screws. Pilots who have modest mechanical skills can also modify them for reuse and is recommended for pilots who do their own engine work. It is impossible to correctly torque the finger screws when reinstalling them unless the pawls and springs are removed. The cooling fan spins at over 9,000 RPM and must be properly attached. A loose cooling fan will grind away the mounting points on the flywheel.
Removal
- Remove the (3) screws that attach the pull starter to the cooling box. Do not lose the small lock washers that are under the screws.
- Carefully grind down the tips of the finger screws with a Dremel-type tool or a file just enough so that the washer can be removed (rocked off with a pair of pliers). Be careful not to grind on the washers.
- Remove the washers, pawls, springs, and finger screws.
Assembly
Refer to the photo below for the correct placement of the starter parts. Use of threadlock is not necessary when reinstalling the finger screws nor for the screws that attach the pull starter.
- Position the cooling fan over the holes in the flywheel
- Push the finger screws through the pawl holder plate and then through the aluminum spacers.
- Please this assembly into the holes in the cooling fan and then into the threaded holes in the flywheel.
- Tighten the finger screws in steps to 10 Nm with a 10mm deep socket.
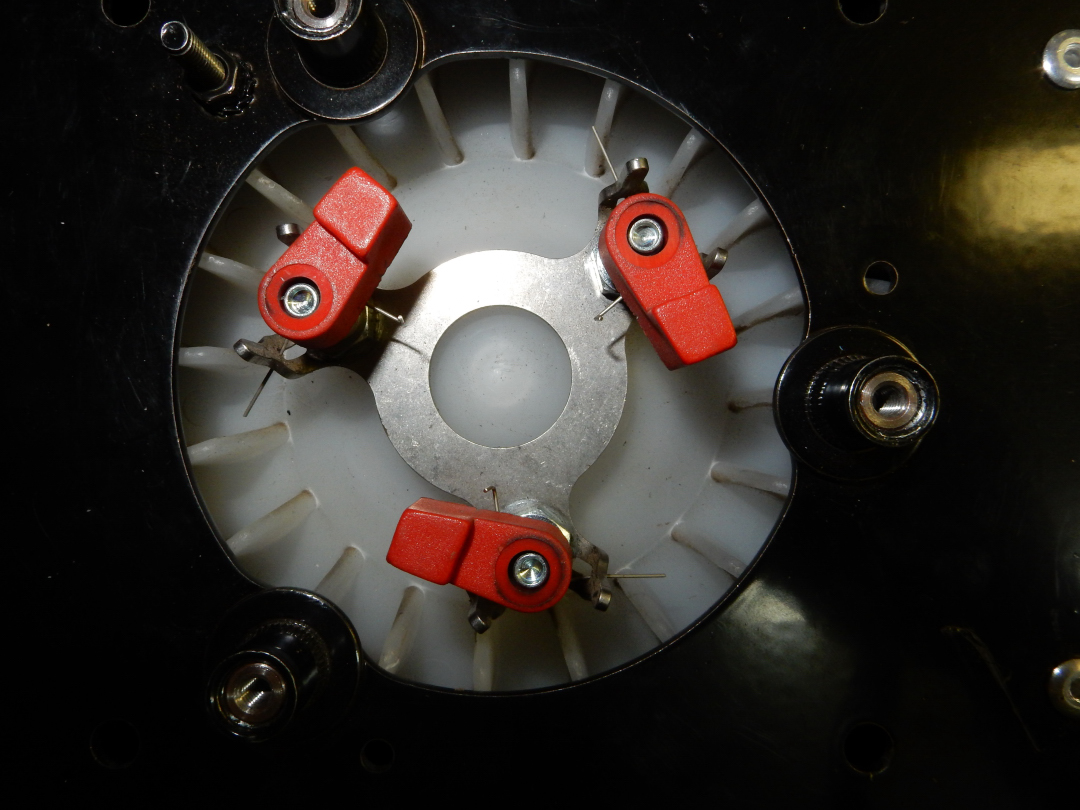
- Place the springs onto the ends of the finger screws. The ends of the springs must be placed in the trailing edge slots of the pawl holder.
- Place the pawls on the fingers screws. Use some masking tape to hold the pawls down on the pawl holder. This will help ensure that the washers are fully on the ends of the finger screws when they are peened.
- Put the washers on the ends of the finger screws. BE ABSOLUTELY CERTAIN THAT THE PAWLS AND SPRINGS ARE IN THE CORRECT POSITION. See photo below. Once you peen the ends of the screws, you cannot change anything.
- With a 3/8" cold chisel and a ballpeen hammer, peen the ends of the finger screws just enough so that you cannot rotate the washers by hand. If you have the modified finger screws, peening the ends of the screws is not needed.
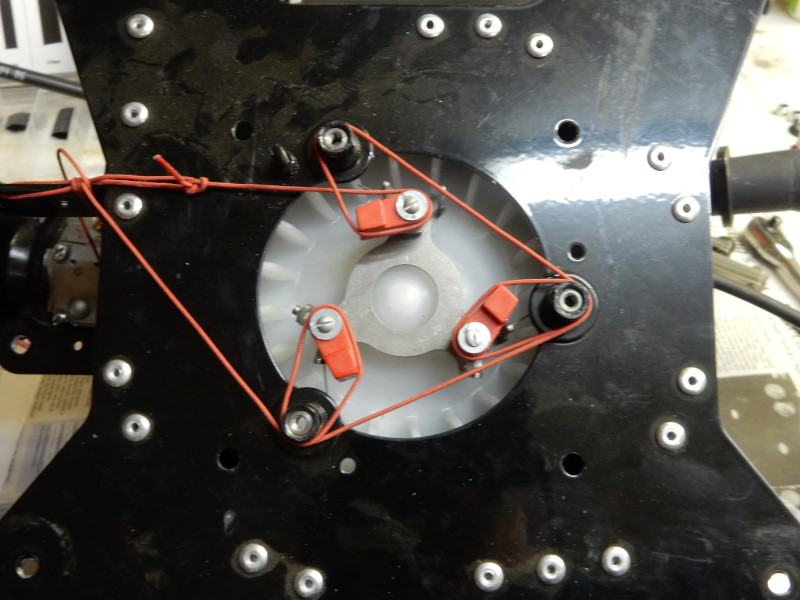
- Use some fine cord to hold the pawls in position to help when reattaching the starter to the cooling box. See the last photo on this page for how to run the cord.
- Attach the pull starter to the cooling box. DO NOT OVERTIGHTEN THE STARTER SCREWS. 2-3 Nm is plenty or just snug.
This photo below shows the correct way to install the pawl springs before placing the washers on the end of the finger screws and peening the ends with a small cold chisel.
How to use some cord to hold the pawls in position while reattaching the starter.
![]()

