


Spark plug information and installation-replacement
by Had Robinson
updated December 12, 2024
REMEMBER: SPARK PLUGS DO NOT WEAR OUT IN 2 STROKE ENGINES, THEY FOUL OUT!
(see "B. Installation" below for the how-to.)
A. General Info
DO NOT ATTEMPT TO CLEAN SPARK PLUGS. IT TAKES SPECIAL EQUIPMENT AND IS NEVER COST EFFECTIVE. ALWAYS REPLACE. The proper solution is to always buy a new plug. The only exception might be is if you have a sandblaster and live in a country where sparkplugs are expensive or hard to obtain. Sandblasting removes the ash and other fouling due to the burning of the oil in the gasoline. Use a thin file (not sandpaper) to dress the electrodes. Sharp edges are more effective in igniting the air-fuel mixture. In the U.S. and some countries, it is not worth the time or effort to clean spark plugs.
Here is an example of a spark plug that looks normal but was shorted out from an attempted cleaning.
Parts of the spark plug – from Denso
Loose plug You can tell if your spark plug has not been torqued down correctly by looking for the presence of black oil extending out from the base of the spark plug. A correctly torqued plug WILL NOT LEAK OIL. If you tighten the spark plug to specification (16 ft. lb/21 Nm) and you still see oil extending out from the base of the washer, tighten the plug to 19 ft. lb/24 Nm and see if it still leaks. There will always be a small ring of oil around the base of the plug/spacer but not past. If the plug is torqued properly and it is still leaking, see the next section.
Dirty cylinder head threads NGK notes that the spark plug holes should always be cleaned prior to installation, otherwise you may be applying torque against dirt or debris and the spark plug may actually end up under-torqued, even though your torque wrench says otherwise. A spark plug hole chaser should be a part of every pilot's tool collection.
Hot running conditions means heavy pilots (180 lb+/82 kg+) who run their engines at full power for more than a few minutes at a time, especially at sea level with ambient air temperature above 30C/85F. It is easy to see how well your engine is running, generally, by examining the spark plug. "Cold running conditions" means everything else. With NGK (and Denso) the higher the number, the colder the plug runs. E.g., an NGK B10EG runs cooler than a B9EG. If the plug gets too hot while running, it can cause pre-ignition and engine overheating. If it runs cold the plug will foul more quickly. So, if your spark plug is consistently black/sooty in color it mean that you need a hotter running plug, like the B9. Remember that ignition and fuel system problems can cause even a hotter plug to foul. Similarly, an overheated plug can be caused by fuel starvation. To sum up, do not change the factory specified heat range of your plug without making sure your engine is tuned correctly and maintained.
Iridium plugs Pilots may use NGK's Iridium line of plugs. They are better quality and last longer but the cost difference is at least 3X the stock spark plug. Some claim they give better performance. This is probably true over the life of the plug. Nonetheless, they must be gapped correctly and will also foul just the same as the stock spark plug. Some non-NGK iridium plugs have a special ground electrode that retards wear. If a pilot has to take the plug out every 10 hours or so to check the gap, why not spend a few dollars and replace it with a new one? The cost of spark plugs (standard and iridium) in some countries may be so high that it is better to go with the iridium.
Fine wire vs. standard center electrode e.g. B10ES vs. B10EG The ES has a standard nickel plated center electrode and the EG has a fine nickel center electrode. The fine wire center electrode was developed for 2-stroke engines to make them start easier and reduce fouling. The EG costs more but performs better. Sparkplugs.com has valuable info on why the difference in plugs. This site has more information than any other that I know of.

figure 1

figure 2
Resistor plugs have an "R" in the label. Miniplane does not recommend the use of resistor type plugs (e.g. BR9ES) for the Top 80. Pilots will have less radio interference caused by ignition noise when using resistor type plugs. You will have to experiment with your engine. Plugs that are not the resistor type will have a more intense spark, make the engine easier to start, and may have improved fuel economy.
Poor performance, poor idle, or a weak top end is most often caused by a worn out spark plug, incorrect spark plug gap, a fouled spark plug, or a failed secondary wire (see below).
NGK has a general information sheet on spark plug installation.
In order to check the general condition of your ignition system, run your engine at full power in the air for a few minutes, kill it at full power, and then land "dead stick". This is the only way you can get an accurate idea of the condition of your fuel and ignition systems. Note: there will always be a small amount of burned oil around the base of the plug. If the oil extends beyond the base, the plug has not been torqued down properly and is leaking. This will cause loss of power and overheating.
Below, a spark plug in good condition. Notice that there is NO fouling of the center electrode. This is very important. Nonetheless, this plug is worn out and should be replaced. This can be observed by the rounded edges of the inner electrode. Plugs will soot up very quickly at idle which is why pilots should keep idling to a minimum.
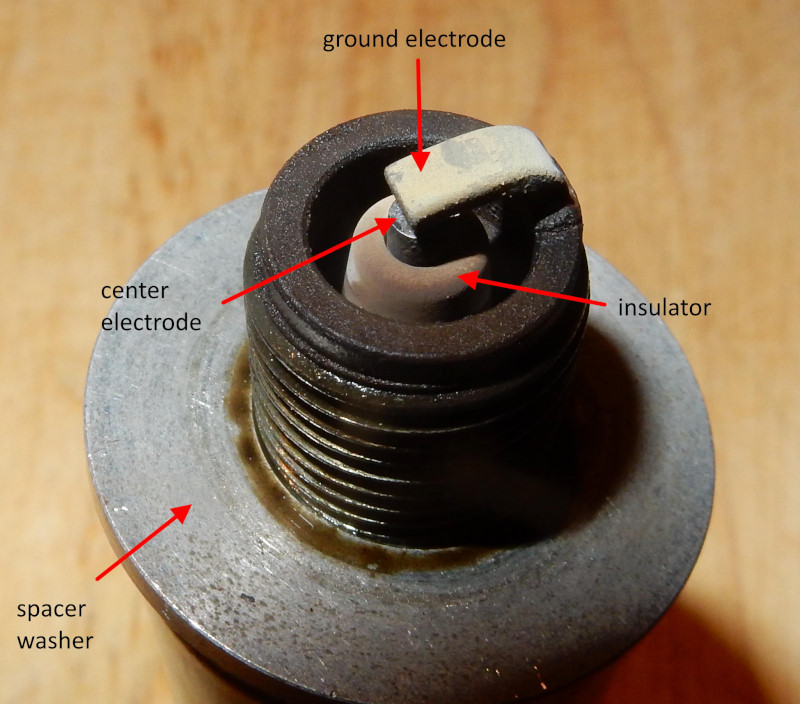
figure 3
The spark plug below was run in an engine that used premium unleaded, ethanol free, gasoline. It has some fouling but still worked well. The plug was running a cold (some fouling present) so a hotter plug would be advised e.g. a B9. Note that the electrodes have sharp edges which means the plug is not very old. Always check the gap.
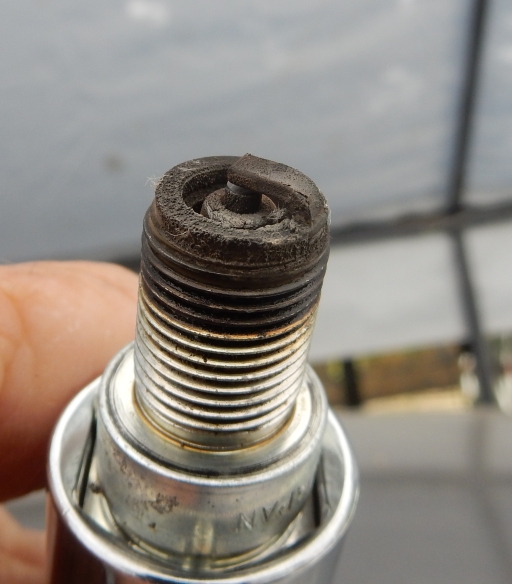
figure 4
Performance of the engine at the top end is everything per evaluating its condition. If anything is wrong with any part of the ignition or fuel system, the engine will not achieve maximum power output. Generally, always be careful running your engine at full throttle for long periods of time, especially if you are near sea level. Install a CHT so that you can have some idea of the engine's normal operating conditions. Monitoring the running temperature of the engine can alert pilots of potential disaster.
B. Installation-replacement
Parts of the spark plug (from Denso) – the instructions below will refer to the respective part # given on this page.
Tools required
Wright 9531 spark plug gauge & gap tool (you cannot correctly adjust the gap without a wire-type gauge)
Lisle #20200 14mm Spark Plug Hole Thread Chaser
OR
spark plug hole thread chaser 14mm and 10mm
3/8 in. drive 13/16 in. spark plug socket
3/8 in. torque wrench
spark plug
dielectric grease
red threadlock for the plug terminal if the terminal is not permanently installed at the factory
Do not use ANTI-SEIZE compound on the threads of the spark plug that enter the cylinder head.
1. Remove the old plug and observe it. If it does not look like the plug in figure 3, than you should find out why. Is there is a fuel system or ignition problem? Is the plug too hot or too cold? Note any presence of oily goo at the base of the plug. If there is a lot of it, the plug may not have been torqued correctly due to the presence of these deposits in the threads of the cylinder head. A thought: Store your old plug in the original little pack with the date and hours of the motor. That way, you can get a timeline and have a good idea how your engine is doing over a long period.
2. Check the gap of the new plug (area of #10 in the Denso diagram). You cannot accurately measure the gap without using a wire-type gauge. Gauges in auto parts stores are for car spark plugs which have a much greater gap instead of the small gap in many paramotors. Set the electrode gap to the minimum value because the gap always widens as the plug is used. Too much or too little a gap will cause the engine to miss at high loads and make it harder to start. It is a good idea to check the gap every 10 hours and adjust as necessary. Pilots would be surprised at how fast the gap changes on high performance engines like a paramotor.
3. Unscrew the top terminal (part #2) with pliers and put red threadlock on the threads. Note: some plugs have terminals which are welded on. The welded terminal will have a top that is flush. The screw-on terminal is not flush and the threaded male post coming out of the spark plug is clearly visible in the center. The plugs with a welded terminal do not require threadlock e.g. the NGK BR10EG. The top terminal will always loosen if threadlock is not used, even if tightened with a pair of pliers. If the upper terminal gets loose, the internal threads on the terminal will be destroyed and the terminal will come free. It will then become embedded in the end of the boot. A loose terminal in the boot will not contact the plug properly and will cause missing at high loads. Pilots would not believe how often I find this problem when working on motors.
4. Chase the hole in the cylinder head with the special tool. Note: this is NOT required on new engines that have not been run before. Put a few drops of cutting fluid on the tool. If you do not have cutting fluid, use some penetrating oil or very light machine oil. DO NOT USE ANTI-SEIZE COMPOUND. Combustion deposits have a way of working up the spark plug threads in the cylinder head. These deposits, as NGK notes in their installation manual, prevent the spark plug from being torqued properly.
5. CHT sensor probe – if the engine has a CHT, remove the factory installed gasket on the plug by unscrewing it with pliers. The gasket interferes with the copper probe being able to freely rotate around the base of the plug. The copper probe also acts like the factory installed gasket, sealing the spark plug. Screw the plug into the probe. Engines that have the new 10mm spark plug may notice that the smaller diameter plug chews into the probe much worse than a 14mm plug. This can be fixed by adding a 10mm aluminum washer to the plug and then installing the probe. The probe may not rotate freely around the plug, however, so pilots may have to ream the inside of the probe just enough so it turns freely. We have the washers for $2 ea. free shipping. Please contact us if you need one. It is highly recommended that all paramotors have a CHT. It's like having a car with no warning lights. They are not needed most of the time but then....
6. Washer spacer – Do not forget to place the spacer washer underneath the spark plug, if the engine manual specifies one. (This is NOT the gasket placed under a new spark plug by the factory.) The washer lowers the compression and engine running temperature to an acceptable level. Failure to use the washer will damage the engine. Use a thicker washer if you must use low octane/poor quality fuel. These washers can be purchased from Miniplane USA. Remember that a cooler running and lower compression engine will last longer. Heat kills small engines. The higher the output of an engine, the shorter its life.
7. Screw the spark plug into the hole with your hand. Be certain that it goes smoothly all the way in and does not bind. Binding is caused by combustion deposits that were not removed and why you must have a chase tool to clean the threads in the cylinder head.
8. Set the torque wrench (if the clickable type): 14mm plug 25 Nm (18 ft. lb.), 10mm plug 10 Nm (9 ft. lb.). The Harbor Freight cheapie torque wrenches are too variable to use for this purpose. Use a beam-type, instead, unless you have a $75 clickable torque wrench. If you have a CHT installed, be sure that the sensor probe is not touching any part of the engine where it come up past the spark plug. If the plug is not torqued down properly it will LEAK at high loads. You will notice this by reduced top end power and black oil extending out from around the base of the plug. There will always be some oil right at the base of the plug but it should not extend out beyond the plug.
9. Boot installation – Smear a small amount of Spark Guard or equivalent inside the boot. The dielectric grease will permit the boot to be firmly seated and lessen wear of the boot, a common problem. Push the boot firmly down on the plug as far as it will go. Twisting it gently as you push down will help. If the boot is not fully pushed on, the spark will fail under high load and the engine will miss and/or experience a loss of power. As the boot wears, pilots will notice this by an abundance of black soot (pulverized rubber) inside the boot and on the terminal of the spark plug. If pilots replace the secondary wire with our kit (an automotive-quality boot and heavy duty wire), the secondary wire and boot will last much, much longer.
10. Test run the engine. Use a felt tipped pen and write something like this on an open aluminum part of the engine, "plug xxx hrs." Doing this will greatly help you to remember
when you should replace the spark plug. When I change my plug, I also change the redrive/clutch oil at the same time as they both have about the same maintenance interval.
![]()

