

Installing the Miniplane safety netting
by Had Robinson
updated September 11, 2023
This procedure can be used for installing the netting that comes with a new Miniplane paramotor or a replacement netting. The netting with a new paramotor is already assembled with the inner and outer tension-lines, measured, cut, installed, and the fittings tied at the right places. If you have an assembled netting (new paramotors only) you may only have to tension the netting.
The netting is tightened in (3) different ways. The outer circumference is tightened by firmly pulling the netting to the extended rivets near the holes in the frame where the fiberglass rods go. The inner circumference of the netting is tightened by pulling on the tension-line that is around the inner circumference of the netting. The inner tension line can be further tightened by stretching the line towards the front of the frame using the ends of the inner tension-line. Everything stretches and loosens up after the paramotor is used a bit. This is why you want to be sure you initially install the netting tightly.
NOTE: TAKE LOTS OF PHOTOS OF THE RINGS, LINES, AND KNOTS SO YOU WILL HAVE A RECORD ONCE YOU REMOVE THE OLD NETTING AND REPLACE IT WITH THE NEW.
1. To reduce netting wear, pilots may put black electrical tape on the surface of the cage sticks where they contact the inner tension-line. Cheap electrical tape makes a gooey mess after a while. The premium tape does not.
2. Remove the old netting. Unclip the rings and carabiners at the base of the cage so that the inside tension-line is completely free at both ends. Disconnect the side sticks from the rod holders. To free them from the rods, use a dead blow hammer to tap the rod holders as it you are driving them further onto the rods. Then squeeze the black ring on the rod holder towards the outside of the holder. This releases the tension grip on the end of the rod. At the same time, pull the rod holder off the rod. The rod holder should slide off. If it does not, tap the rod holder again and repeat the above step. Remove the (4) rods. You may have to drill out the rivet that holds the netting to the fitting on top of the upper sticks.
3. Place the center of the new netting on top of the upper sticks fitting. The center hole in the cloth rim of the netting has the netting sown on one side. This is the side that faces forward. The upper (2) rods next to the upper fitting are the ones with a bare end and the metal sleeved end. They go into each side of the upper cage fitting. Insert the each upper rod in the second rod fitting hole in the netting (away from the center). Thread the upper rod a little towards the upper cage fitting. Put a rod fitting in the first rod fitting hole (about 26 1/2" from the center of the netting) in the cloth rim and thread the rod through it. Make sure the rod is fully seated in the upper cage fitting. Do the same for the upper rod on the other side
4. Take the lower rod (the one with a bare end and a thicker end of fiberglass material) and thread it into the open end of the netting. As you slip it in, put another rod fitting in the second hole and thread the lower rod through it and into the metal sleeve of the upper rod. Make certain the rods is fully seated in the metal sleeve.
5. Bring down each of the rods and insert them firmly in the holes at the bottom of the frame. The outer circumference of the netting will be ready to be secured at the base of the frame.
6. Screw in the (4) side sticks so that the net is on the front side of the side sticks. You may use some premium black electrical tape to wrap around the stick joint so that it does not unscrew when the engine is run. DO NOT USE THREADLOCK ON THE STICKS. Attach them to the plastic rod fittings by pushing the rod ends into the holes gently and then giving the rod holder a gentle tap so that it goes home on the rod.
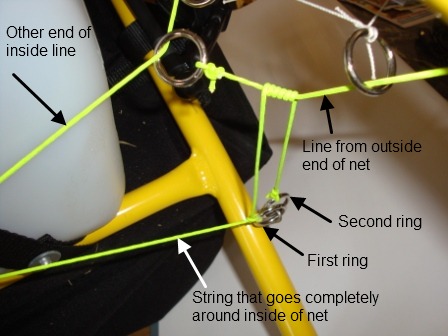
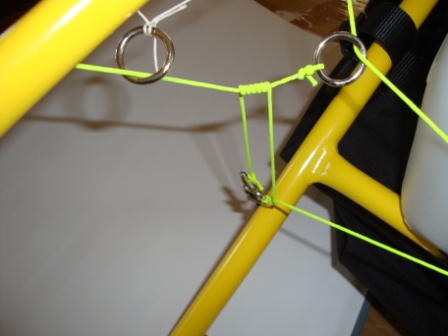
7. At each end of the outer circumference of the netting, a double loop of line is required (see the photo below). This is what tightens the outer circumference of the netting. Cut a piece of line 50cm (20") long. Make a double loop through the cloth loop and run a single loop over the raised rivet on the frame. Pull the cloth loop to the end of the hole in the frame where the rods are inserted by pulling on the end of the second loop. Tie a knot in the end of the two lines. Now you can pull things tight and make a second knot about 1.5" away from the first knot at the end so that the loop can be easily pulled. Do the same for the other end of the netting. The inner second knot at both end of the netting are what tighten the outer circumference of the netting.

Measure the distance of the line from the outer circumference end of the netting to the ring on the inner circumference end of the netting. It should be about 25cm (9 3/4"). Tie a double half hitch to secure the ring. The ring is usually in place in replacement netting kits but it may not have the correct length from the outer circumference of the netting.

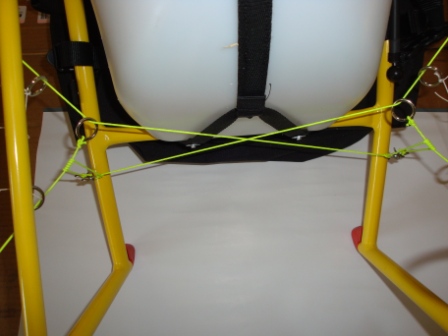
8. Fish the new line through the inner edge of the netting and through both rings at the end of the new netting. Leave and equal amount of line at both ends. Put a ring on one of the hooks near the base of the frame. Take one end of the line from the OPPOSITE side, go across the base of the fuel tank, temporarily attach it to the ring that is on the hook with a single half-hitch knot. Put a ring on the opposite hook and take the other end of the line across the base of the fuel tank and temporarily attach it to the ring on the hook with a single half hitch. Tighten both half-hitches so that the line is taunt.
Work the netting around the inner line. The inner line will loosen as you work the netting. Tighten both half-hitches equally until the line is taunt. The netting stretches over time and loosens so you want to be sure it is tight at this time. When the line is taunt, make each know a double half hitch. If you make a mistake, you can loosen the knots and redo things. You want the inner tension-line tight all the way around the netting. This is a SAFETY issue.
Once this is done there will be a lot of extra line where the line attaches to the rings.
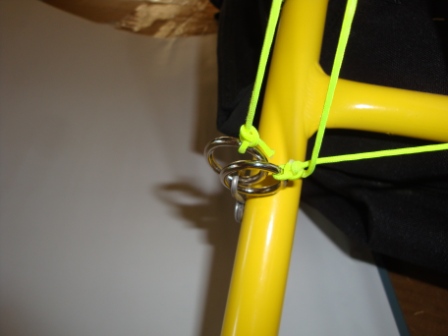
9. Take the last pair of rings (or carabiners) and put them on the hooks.
Take the end of the excess line back and then around the line that goes to the opposite hook and secure it to the 2nd ring (or carabiner) with a single half hitch. This 2nd ring (or carabiner) can be removed from the hook and wrapped a 2nd time around the line to increase the tension on the inner line. See the last photo on this page for how this looks and how the tension of the inner line can be increased.
10. Work the netting again so that it is tight. You may have to adjust the knots. Once you are certain that everything is correct (and looks correct), put some Superglue on the knot on the ring of the short line going from the outer to the inner ends of the netting. The length of this line should not have to be adjusted again.
After a few hours of flying, check the tension. Once the tension is stable, you can use some Superglue to make all of the knots permanent. They do tend to loosen over time, otherwise.
That's it. Someday I will get a video which would make it much easier.
![]()

