

Walbro WB/MPE090 carburetor info
by Had Robinson
updated March 29, 2023
A. Discussion
The WB and MPE090 carburetors are identical except that the WB has an external pulse port and the MPE090 has an internal pulse port. The port transfers the pulses from the engine crankcase to the fuel pump diaphragm inside the carburetors.
Rather than a fixed high speed jet like the WG, the WB carburetors have an adjustable high speed needle jet. Be EXTREMELY careful adjusting the high speed system and always follow your paramotor manufacturer's instructions (if any). It is easy to burn up an engine. Generally, if you do not have a CHT (cylinder head temperature gauge), do not change the high speed adjustment from the factory defaults more than 1/8th turn either direction. To say the least, it is unwise to fly without a CHT installed.
Follow this link for general notes on Walbro carburetors concerning design, inherent problems, fixes, and general information that may be helpful.
Rebuild the carburetor if it has been more than a year or after (25) hours of operation, whichever is sooner. Much depends on the gasoline used per how often a rebuild is necessary. Remember that the flexible neoprene parts of the carburetor age whether the engine is run or not. However, if the fuel system is thoroughly purged, these parts will last much longer. A sure sign that the carburetor needs a rebuild is that the idle becomes erratic or idle adjustment becomes difficult or impossible. Pilots can choose to rebuild based on performance but they will run the risk of overheating their engine. If you watch your CHT often while you fly, it is probably OK to rebuild the carburetor "as needed".
If gasoline with ethanol is being used, all bets are off and maintenance intervals will be shorter. Alcohol ages carburetor guts and fuel lines quickly compared to 100% gasoline.
Some engine manufacturers tamper-proof the main needle jet by putting a seal on it so that it cannot be changed. This is largely due to the fact that too many pilots lack basic mechanical skills and experiment with the high speed jet, leaning it out too much. The engine overheats and then they blame the engine manufacturer. The high speed jet on a two stroke engine is adjusted based on engine running temperature, not maximum engine speed. This is because unburned fuel in a two stroke helps cool the engine and why they must run rich.
B. Specifications
These specifications for the WB are stock. Engine manufacturers e.g., Vittorazi may modify the carburetors on their engines. Always check the user manual of your engine for the correct needle jet settings which may be different than those specified by Walbro.
For part location, name, and part number see the WB diagram below.
WB parts kit: #K10-WB
Metering lever value 1.19mm - 1.59mm (0.047" - 0.063")
Metering lever spring length: 13.3mm Pilots should not modify these springs!
Pop-off pressure 1.3-1.4 Bar (19-21 psi) rest pressure > 0.68 Bar (10 psi) minimum
If the pop-pressure is higher than 22 psi, rebuild the carburetor. You may have to replace the metering lever spring. Always make sure the spring meets specifications. If it is bent or looks corroded, replace it. If the rest pressure is too low (the valve leaks), a rebuild is probably all that is needed.
High speed jet basic setting: 1 1/4 turns
Low speed jet basic setting: 1 1/4 - 1 1/3 turns Note: Vittorazi specifies 1/4 - 1/3 turns for their newer models because of mods they make to the WB which include a shorter ML spring and plugging one of the idle progression holes. Minari also modifies the WB.
C. Rebuilding the WB
The WB is serviced the same as the WG except for the high speed adjustment and the metering lever value.
Walbro service manual for the WB – This manual is dated 1995 and is for the WB that was used on a now obsolete Husqvarna chainsaw. It is helpful if you have no information from the engine manufacturer for the WB. It is very close to the WG per operation. The main difference is that the WB has an adjustable high speed needle jet, a different metering lever adjustment value, and a circuit plate rather than a Welch plug covering the idle progression holes. The WB also does not have a choke. The ZAMA service manual is also good to study as these Chinese clones are copies of the Walbro WB series.
Always follow the manufacturer's instructions for tuning your engine, if possible. Be certain that you know the maximum cylinder head temperature specified by the manufacturer before tuning your engine.
D. Adjustments
Start with rich values for the jet settings then fine tune things according to the manual that came with your motor.
High altitude operation
However, pilots who live above 5,000' MSL may have to remove the high speed needle jet seal (if there is one) in order for the engine to run properly. Check with your dealer before removing the seal. On the positive side, the higher the altitude, the less chance there is of burning up the engine. If you are like the writer of this essay, you will like to seriously play with the high speed jet which may result in a piston with a big hole melted in it....
Vittorazi
Vittorazi has modified the WB carburetor on their newer models of the Moster. This affects the low speed jet adjustment and is noted in the specifications given above.
Michael Lange posted on FB a revealing page with photos of what Vittorazi does to the WB carburetor installed on the Moster. Their modifications are not particularly helpful and are just more of the Band-Aids that paramotor manufacturers do to fix the problem with the fuel tank being so far below the carburetor fuel inlet. The Southwest Airsports FSM do-it-yourself project takes care of this problem permanently without having to modify the carburetor. The FSM will work just fine on the modified carburetors. If your engine manufacturer modifies the carburetor, Pilots can replace it with a stock WB and install the FSM. No matter what modifications are done to the carburetor, they will NOT fix the problem of fuel vaporization.
Vittorazi has published a video on rebuilding the WB. It is suggested that pilots soak the new gaskets and diaphragms in gasoline before installation. This is done to help soften the material and create a better seal when installed. Walbro has never suggested doing this for any of their carburetors nor has this writer ever done it. A properly installed gasket set does not leak. Nonetheless, if pilots want to do this, it certainly does not hurt anything. The real issue is that the WB fuel pump was not designed to suck fuel from so great a distance below the carburetor fuel inlet.
Minari
The Minari has particular instructions on how to adjust the WB on the 180cc engine but it is ONLY for that engine and those flying at sea level. If you have the 200cc Minari or fly at higher altitudes follow the instructions on this page.
Idle, low, and high speed adjustment for most paramotors
Use the steps below to adjust your carburetor if your user manual has little or no information OR you operate your engine at high altitude.
These instructions do not require a CHT but it is foolish not to have one. The SWA workbench is littered with burned-up engines which did not have this critically important instrument. Running a high performance engine without a CHT or a tachometer is like not having any warning lights or gauges on an automobile engine. You probably will never need these indicators but, then again, you might....
Minari note: BE CAREFUL THAT THE CHT DOES NOT EXCEED 200-220ºC (392-428ºF) FOR MORE THAN A MINUTE OR TWO.
It is always safer to run an engine a bit rich (runs cooler) than lean (runs hotter). There is a 15-30 second lag in the CHT gauge so always throttle up slowly, watching the temperature. It is easy to quickly overheat the bigger engines as this writer has done.
"Open" = turn the needle counterclockwise while facing it.
"Close" = turn the needle clockwise while facing it.
Never fully close needles with any force. If you do,
you will probably damage the needle seat and/or the needle.
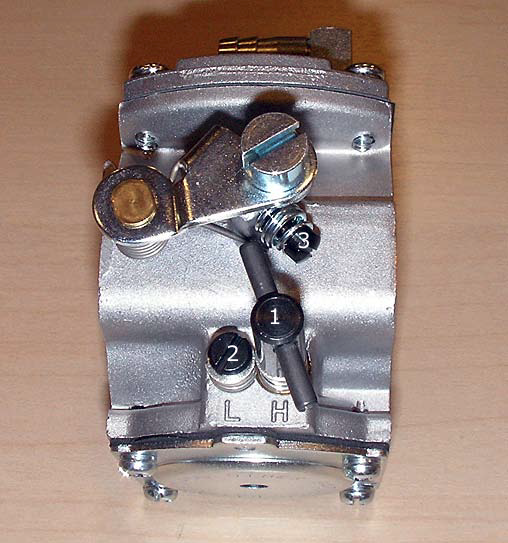
1. Open the high speed (HS) needle (#1) 1.5 turns from fully closed as a basic setting. Open the low speed (LS) needle (#2) 1.25 turns. Start the engine and let it warm up.
2. Turn the idle speed needle (#3) in or out until the idle speed is 1,900 RPM to 2,100 RPM.
Steps #'s 3-4 are potentially very dangerous if the paramotor gets loose while at full throttle. The steps may be skipped if you do not need to adjust the high speed system. It is safest to secure the engine to some immovable object like a tree, car hitch, or telephone pole/post. Be extremely careful getting your hands near the spinning propeller. Thankfully, the REALLY dangerous parts of a spinning propeller are the tips and not the area next to the hub. Alternatively, you can test the engine in the air, land, make an adjustment, re-launch, etc. This method is much safer and less unnerving. If you think it does not matter, see this photo of what the tips can do...
3. Go to full throttle and close the HS needle until there is a slight decrease in RPM. The engine is now running in a slightly lean condition at full throttle. Do not run at full throttle for more than a 10-15 seconds, maximum.
4. Release the throttle and open the HS needle 3/4 of a turn. This must be done carefully. If you find that these instructions result in your engine overheating, simply enrich the high speed mixture. Turn the HS needle counter-clockwise 1/8th of a turn, go to full throttle, and check the temperature. Continue to turn it 1/8th of a turn counter-clockwise until a safe running temperature is achieved.
5. With engine idling, open/close the LS needle until maximum speed is obtained. Suddenly apply full throttle. Go to step "a" or "b", as the case may be.
- If the engine begins to stall, open the LS needle 1/16th of a turn. Quickly apply full throttle again and see if the engine begins to stall. If it does, open
the LS needle another 1/16th of
a turn. Continue this step until the engine no longer stalls when full throttle is quickly applied.
- If the engine does not begin to stall, close the LS needle 1/16th of a turn. Suddenly apply full throttle. If the engine does not stall, continue to close the LS needle in 1/16th increments until the engine begins to stall when full throttle is applied. If the engine begins to stall, back out the LS needle 1/16th turn. This is the correct adjustment of the low speed system.
You may have to re-adjust the idle needle in order to achieve the correct idle speed. In the photo below #1 is the high speed power needle adjustment. #2 is the low speed needle adjustment. #3 is the idle speed adjustment. (image courtesy of Fresh Breeze). Some models may be slightly different than the below model in appearance.
Midrange performance problems & tuning
The WB, like the WG, has midrange problems that cause engines to run rich – and roughly. The carburetor can be modified in the midrange to fix this problem but is not as good or as permanent as installing the FSM but it is still being tested at this time.
DO NOT MAKE ANY CHANGES TO THE CARBURETOR UNLESS YOU HAVE INSTALLED A CHT AND LEARN HOW TO READ IT. IT IS EASY TO BURN UP AN ENGINE. NOTE: MODIFICATIONS TO THE CARBURETOR MAY VOID ANY WARRANTY BY THE ENGINE MANUFACTURER AND THEIR U.S. DISTRIBUTORS. USE ONLY 100% SYNTHETIC OIL AND ETHANOL-FREE PREMIUM GASOLINE, IF POSSIBLE, FOR FEWER PROBLEMS.
E. Parts list and diagram of the WB
This image is generic for the WB model line. Some minor parts are not shown which may be present on some sub-models.
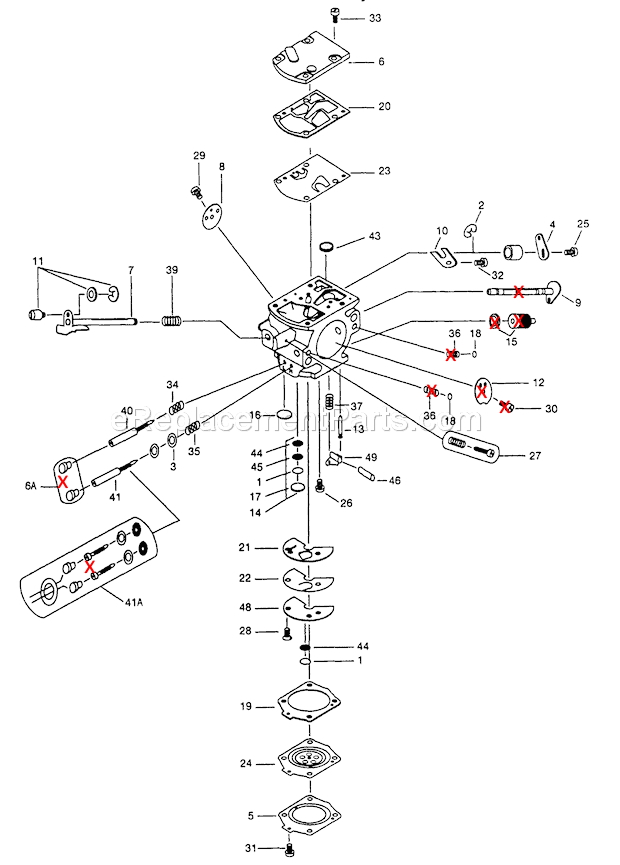
Venturi diameter 25.4mm (image above courtesy of eReplacementparts.com. The parts with a red X through them are not present on most WB's used on paramotors.
* Kit – Repair kit #K10-WB
** Kit – Gasket/Diaphragm D10-WB
1 * Ring – Screen Retainer
2 Ring – Throttle Shaft 16-71
3 Ring – Packing 16-75
4 Lever – Outer Throttle
5 Cover – Metering Diaphragm 21-199
6 Cover – Fuel Pump
21-1195
6A ++ Cap Kit – not present on most models
7 Shaft Assembly – Throttle 30-800
8 Valve – Throttle 34-102
9 Shaft Assembly – Choke -
not present on most models
10 Clip – Throttle Shaft
11 Swivel Assembly 52-540
12 Valve – Choke – not present on most models
13 * Valve – Inlet Needle 82-75
14 Seat Ass'y – Check Valve
15 Governor Kit –
not present on paramotor models
16 * Plug – Welch
17 * Plug – Welch
18 Ball – Choke Friction - not present on most models
19 ** Gasket
– Metering Diaphragm
20 ** Gasket – Fuel Pump 92-149
21 ** Gasket – Circuit 92-185
22 ** Diaphragm – Check Valve
23 ** Diaphragm – Fuel Pump 95-65
24 **
Diaphragm Assembly – Metering 95-515
25 Screw – Lever to Shaft
26 Screw – Metering Lever Pin 96-156
27 Screw – Idle Adjust Kit
28 Screw – Circuit Plate 96-270
29 Screw – Throttle
Valve
30 Screw – Choke Valve -not present on most models
31 Screw – Metering Cover – [4]
32 Screw – Throttle Clip
33 Screw – Pump Cover – [4] 96-543
34 Spring – Needle (idle) 98-160
35 Spring – Needle (power) 98-160
36 Spring – Choke Friction - not present on most models
37 Spring – Metering Lever 98-299
39 Spring – Throttle Return 98-308
40 Needle – Idle 102-3113
41 Needle – Power 102-531
41A Needle & Cap Kit - not present on paramotor models
41B Washer – Needle 136-106
43 * Screen – Fuel Inlet 140-33
44 * Screen – Check Valve
45 * Screen – Check Valve
46 Pin – Metering Lever
46A Bushing –
Throttle Shaft
48 Plate – Circuit 157-587
49 * Lever – Metering 166-35
![]()

