


Polini Flash starter insert installation
Important note: this page is for reference ONLY. We no longer recommend using the flash starter insert. It is far better (and economical) to use the Briggs & Stratton starter (or its Chinese clone). It is not the flash type but it is much more durable and about 10% of the cost of the OEM.
Starter Parts
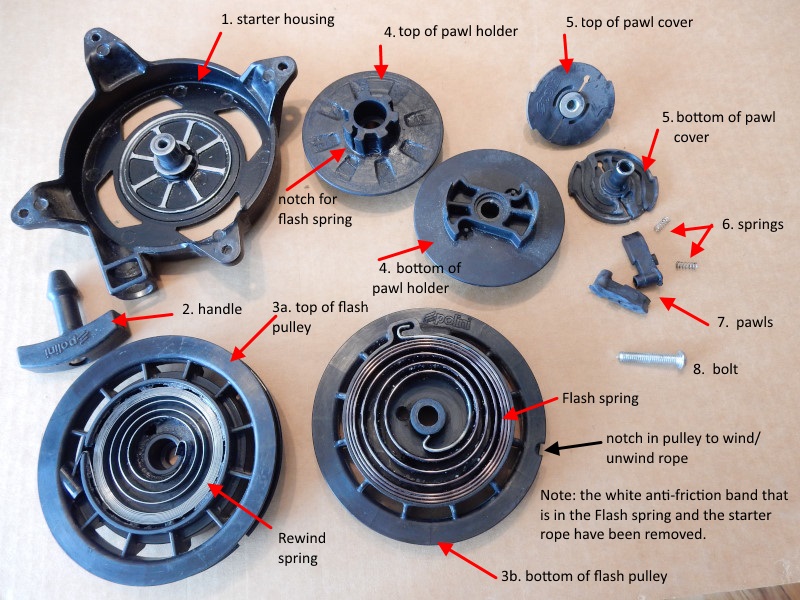
Kit contents
(1) machined aluminum insert
(1) stainless steel screw 5mm x 0.8mm x 90mm and a 5mm locknut to replace the lower starter mounting screw
The replacement screw is necessary because the engineers at Polini failed to account for the high load put on the screw and its threaded hole in the engine casing when the starter rope is pulled. The starter is, effectively, only attached with (3) screws because the top screw attachment point in the cooling shroud is nearly useless. This is why the remaining (3) attachment points must have greater strength. With the Flash mechanism gone, the stress on the starter mounts is greater and pilots must be careful to not yank on the starter.
Assembly Instructions
1. Remove the (2) 5mm bolts which attach the harness to the top of the frame. Let the harness drop down enough to access the backrest attached to the frame. Alternatively, disconnect both sets of lower straps that go from the harness to the frame. The harness may then be flipped up and out of the way of the backrest plate.
2. Remove the (6) button-head screws which secure the backrest plate to the frame. This will expose the front of the engine). On some models, the backrest is attached with rivets which must be removed. They can be replaced with screws, if desired.
3. Detach the (2) starter rope pulleys from the frame.
4. Remove the (4) starter mounting screws and the starter. It is likely that the lower screw and/or the threaded hole in the engine casing is stripped. If the screw is intact, keep it as a spare.
5. Disassemble the starter.
a. Remove the screw and pawl cover (#5)
b. Remove the pawls (#7) and springs (#6)
c. Remove the Flash pulley (#3). CAREFULLY DISENGAGE THE REWIND SPRING FROM THE STARTER HOUSING (#1).
d. Remove the Flash spring. The spring is not under great tension and can be safely removed by grabbing the center end with a pair of
locking pliers and gently pulling it out. DANGER. WEAR GLOVES AND EYE PROTECTION WHEN HANDLING THE FLASH SPRING.
DO NOT FURTHER DISASSEMBLE THE STARTER.
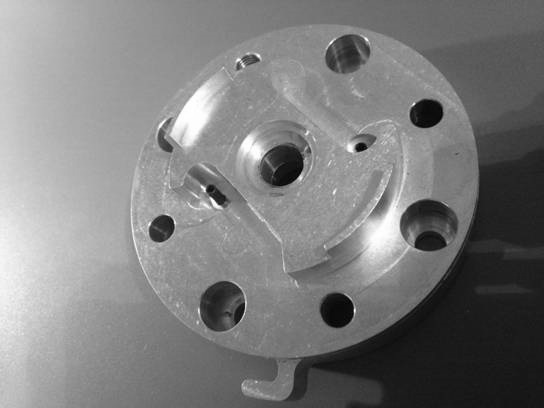
Here is the starter without the Flash spring. Clean all grease and debris out of the cavity. Use brake cleaner to thoroughly clean the center mounting hole. If it is not clean, the threadlock will not hold the mounting screw. If the Flash pulley becomes loose while the engine is running, the moving parts of the starter and the cooling fan will be destroyed.

6. Assemble the starter with the flash insert replacement.
a. Place the aluminum insert into the cavity that held the flash spring.
b. Place the springs on the roll pins in the aluminum insert
c. Use copious amounts of wheel bearing grease on all parts. This only slows down the wear on these parts but does not eliminate it.
DO NOT GET GREASE/OIL IN THE CENTER SCREW HOLE.
c. Place the pawls over the pins and springs.
d. Line up the pawl cover so that the tangs on pawls are in the groove in the cover. Place plenty of BLUE threadlock on the center
screw and tighten it. Do not over-tighten the 5mm screw. It just needs to be snug.
7. Test the modified starter by pulling it a few times. The pawls should smoothly move out from under the pawl cover as the cord is pulled and retract when the cord is released.
8. Mount the starter on the engine. Use BLUE threadlock on all but the top screw. If the top screw is secured with threadlock, it can be difficult to remove after the threadlock cures because the threaded insert in the plastic housing will just turn ... and turn. Replace the lower screw with the longer one, installing it like the other screws. If the threaded hole in the engine casing is stripped, it does not matter. Place the locknut on the end of the new screw. This firmly secures this mounting point. Be extremely careful to not over tighten the mounting screws. They should be just snug – 4-6 Nm of torque is sufficient. The whole mechanism and mounting points are flimsy and easily ruined.
Note: We have discovered that technicians at the Polini factory sometimes strip the starter mounting screws and/or the threaded holes in the engine casing during assembly. I recommend that pilots do not bother to replace engine parts that have stripped threaded inserts/holes but use HeliCoils, even if the engine is under warranty. This is because you will just have the same problem again, sooner or later. It is the price we pay for having one of the quietest and smoothest paramotors on the market. Hopefully, these annoyances will be fixed by Polini. Meanwhile, consider how small the paramotor market is and how good the Polini is, otherwise. If the paramotor market were 1000X what it is, the Japanese would take notice and make engines that would last for 1,000's of hours, run like clocks, and be of great durability. It is what it is.
9. Test the starter on the engine. I recommend putting the paramotor on your back if you plan on starting it. Reach back and pull gently on the starter until resistance is felt. Pull firmly with both hands to be sure that the starter is operating correctly. If so, continue with the next step.
THE POLINI STARTER – EVEN WITH THE MODIFICATION – IS FLIMSY. DO NOT YANK REPEATEDLY ON IT. THIS WILL DESTROY IT IN SHORT ORDER. THE STARTER MUST BE CAREFULLY MONITORED AND MAINTAINED – SEE THE SPECIFICATIONS PAGE FOR THE THOR.
10. Reassemble the back plate and harness.
11. Prime the carburetor using this technique. It is important that pilots always use this method to start the engine as it will minimize yanking and repeated pulling on the starter mechanism and wearing it out quickly.
Post Modification
The engine has high compression and is much harder to pull over without the Flash mechanism. It is suggested that it only be started with the paramotor on the back using two hands. For pilots of average strength and size, this is a much better and SAFER option.
Watch the starter carefully. You will know when it is time for service if the pawls do not easily and readily engage the starter ring on the flywheel. See the Flash starter page for more information.
![]()

